Why Use a JDBC-to-JDBC Bridge?
The OpenLink JDBC-to-JDBC Bridge enables Java applications to connect to remote JDBC-accessible databases through OpenLink’s multi-tier architecture, providing enhanced security, scalability, and centralized configuration. The Enterprise Edition provides this core functionality with several powerful advantages:
Fine-Grained Access Control
Powerful attribute-based access controls (ABAC) as JDBC session-level enforcers of data access policies, aligned with governance requirements and compliance standards.
Enhanced Data Security
Comprehensive protection mechanisms addressing data security and privacy challenges, ensuring sensitive information is protected at the session level.
Deployment Flexibility
Flexible topology options essential for managing large-scale JDBC-based client applications and services in enterprise environments.
Overview
This guide walks you through the installation of the Enterprise Edition JDBC to JDBC Bridge Driver on a Linux host. The host acts as a client to a remote database accessible via its native JDBC driver.
Pre-Installation Requirements
- A 64-bit JVM must be installed and configured.
- A third-party or native JDBC driver that connects to the target database must be available.
- The JDBC driver's
.jarfile (or a symbolic link to it) must be included in the activeCLASSPATHenvironment variable. - The JDBC driver's class name must be known.
- The JDBC connection URL that connects to your target JDBC Data Source must be known.
- The location of the
libjvm.soshared library must be set in theLD_LIBRARY_PATHenvironment variable.
Installation Steps
Download the Installer Archive
Use the following commands to download the required installation files:
curl -O https://download3.openlinksw.com/uda/components/misc/install.sh
curl -O https://download3.openlinksw.com/uda/components/9.0/x86_64-generic-linux-glibc25-64/opljdbc.taz
curl -O https://download3.openlinksw.com/uda/components/9.0/x86_64-generic-linux-glibc25-64/jdbc_sv.taz
curl -O https://download3.openlinksw.com/uda/components/9.0/x86_64-generic-linux-glibc25-64/oplrqb.tazPrepare Installation Directory
Log onto the target machine, create a suitable OpenLink installation directory (e.g.,
/opt/openlink), and copy all downloaded components into it.
Run the Installer
Install the OpenLink components using the install.sh shell script:
sh install.shTake care to enter correct information when prompted (ports, passwords, etc.) and note these details for future use. The installation should finish without error.
Configuration
Set Up Environment
From within the {OPENLINK_INSTALL} directory, source the environment script:
. ./openlink.shConfigure JDBC Environment in oplrqb.ini
Open the file {OPENLINK_INSTALL}/bin/oplrqb.ini. Locate the
[Environment JDBC18] section and set the CLASSPATH to your JDBC
driver's .jar file and the LD_LIBRARY_PATH to the directory containing
libjvm.so.
[Environment JDBC18]
CLASSPATH          = {JDBC Driver JAR file}
LD_LIBRARY_PATH = {Directory of libjvm.so file}Apply License Files
Place your license files (oplrqb.lic and jdbc.lic) in the
{OPENLINK_INSTALL}/bin directory.
Start Services
Navigate to the {OPENLINK_INSTALL}/bin directory and start the OpenLink services in
order:
# Start the License Manager
./oplmgr +start

# Start the Request Broker
./oplrqb -v
Use ./oplrqb -fd to start in foreground debug mode for troubleshooting.
Testing the Connection
Configure JDBC Connection
Create a Java application or use a JDBC test utility to connect using the OpenLink JDBC driver
(opljdbc4_2.jar). The Type 3 JDBC URL syntax is as follows:
jdbc:openlink://<Hostname>[:port] [/SVT=<ServerType>] [/DATABASE=<Schema>] ...Sample JDBC Connection Code (Java)
Replace the bracketed values with your specific connection details.
Class.forName("openlink.jdbc4.Driver");
Connection conn = DriverManager.getConnection(
  "jdbc:openlink://localhost:5000/SVT=JDBC18/DATABASE={JDBC Driver Class Name}/OPTIONS={JDBC connection URL}/",
  "username",
  "password"
);
Statement stmt = conn.createStatement();
ResultSet rs = stmt.executeQuery("SELECT COUNT(*) FROM {table-name}");
while (rs.next()) {
    System.out.println("Count: " + rs.getInt(1));
}opljdbc4_2.jar) is in your
application's CLASSPATH, the JDBC URL is correctly formatted, and the Request Broker is
running and accessible.
Technical Glossary
JDBC (Java Database Connectivity)
The Java native API that enables Java applications to interact with relational databases.
Request Broker
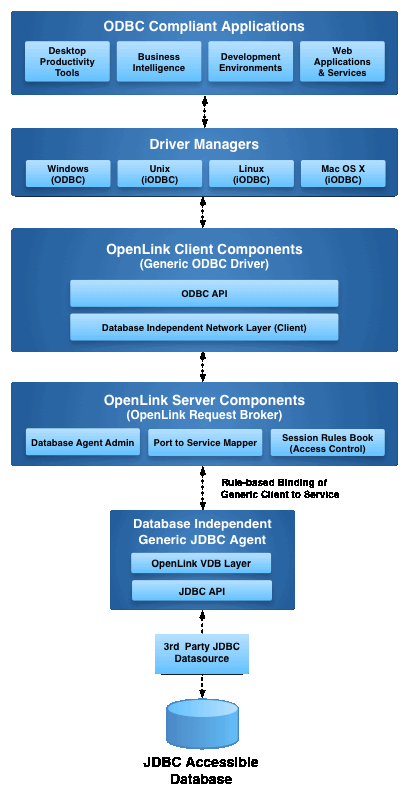
A server-side component of the OpenLink Multi-Tier architecture that manages client connections and routes requests to the appropriate database agent.
Bridge Agent
A component that acts as a bridge between different database connectivity standards, in this case, translating JDBC calls from the client to the target JDBC driver.
CLASSPATH
An environment variable that tells the Java Virtual Machine (JVM) where to find class libraries,
including the JDBC driver .jar files.
LD_LIBRARY_PATH
An environment variable on Unix-like systems that specifies directories where the dynamic linker
should look for shared libraries, such as libjvm.so.
Multi-Tier Architecture
A deployment model where driver components are distributed across client and server machines, enabling better scalability, security, and centralized management.
Frequently Asked Questions
A 64-bit Java Virtual Machine (JVM) must be installed and configured on the machine where the driver will be installed. This is essential for the bridge to function properly.
The JDBC driver .jar file must be installed on the same machine as the OpenLink Request Broker and Bridge Agent, and included in the CLASSPATH environment variable so the JVM can locate it.
The license files (e.g., oplrqb.lic, jdbc.lic) must be placed in the
{OPENLINK_INSTALL}/bin directory.
You can edit the {OPENLINK_INSTALL}/bin/oplrqb.ini file and set variables like
CLASSPATH and LD_LIBRARY_PATH in the [Environment JDBC18]
section.