
Overview
This comprehensive guide walks you through the complete process of downloading, installing, configuring, and testing the OpenLink Lite Edition ODBC Driver for Microsoft SQL Server on macOS systems. The OpenLink Single-Tier ODBC Driver provides a direct, high-performance connection from your macOS applications to Microsoft SQL Server databases without requiring an intermediate middleware server.

Installation Steps
Step 1: Download the Installer Archive
Visit the OpenLink ODBC Lite Edition Driver Download Page to obtain the installer packages.
Alternatively, use curl to download the DMG file directly:
curl -O https://download3.openlinksw.com/uda/components/10.0/universal-apple-macos11-64/m1l10mzzz.dmgStep 2: Run the Installer
Run the m1l10mzzz.dmg macOS DMG installer disk image file, then double click on the
OpenLink-SQLSever-Lite.pkg installer package.
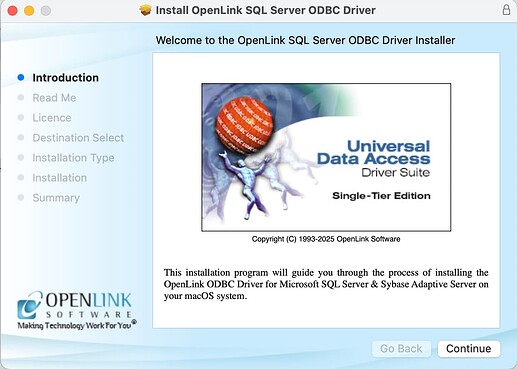
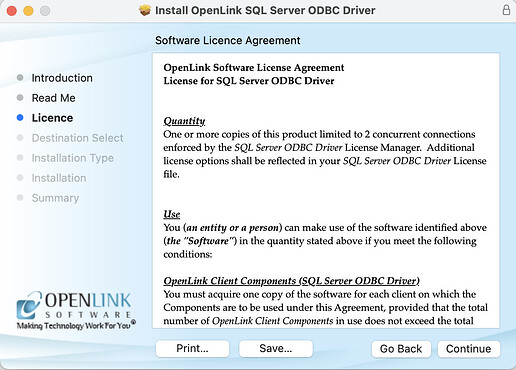
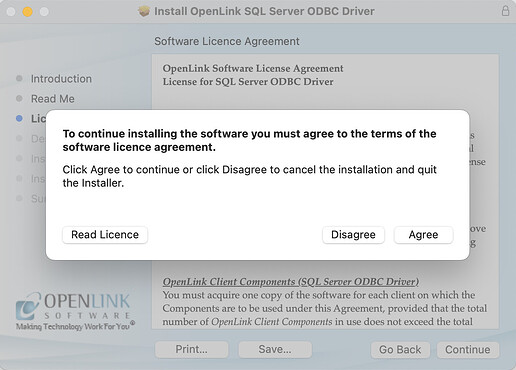
Step 3: Agree to License
Proceed through the installation wizard, read the license agreement, and click Agree.
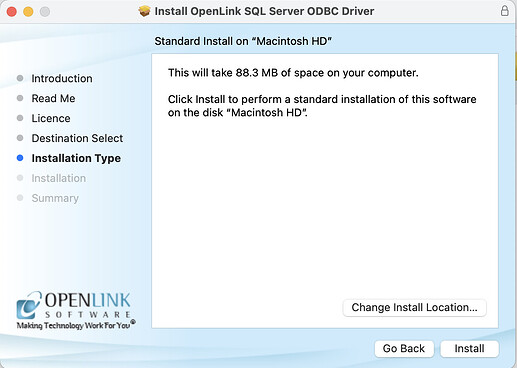
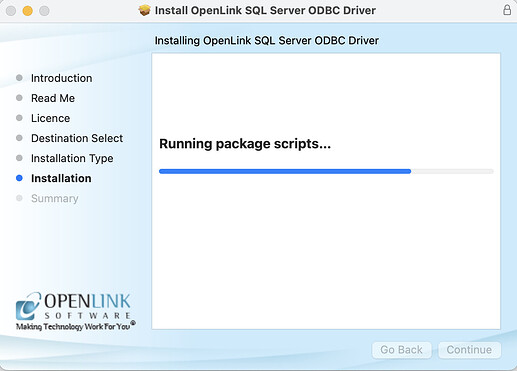
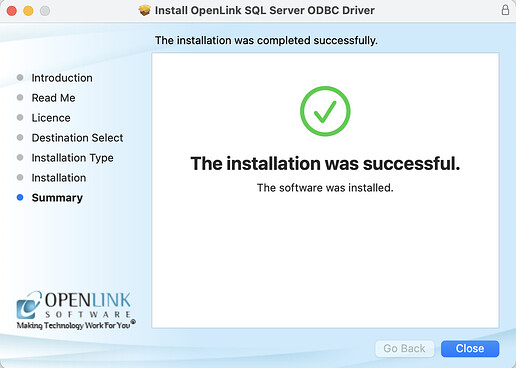
Step 4: Complete Installation
Choose which components to install (defaults are recommended), select the destination, click Install, and wait for the successful completion message.


Configuration
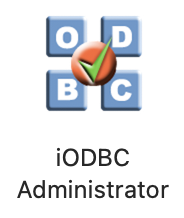
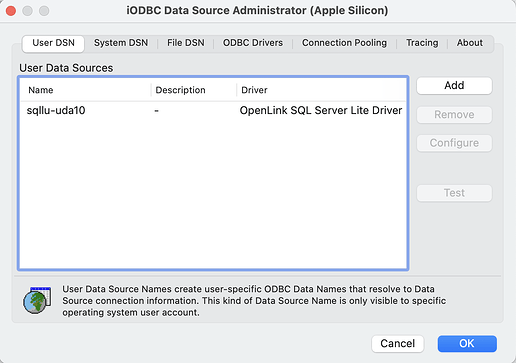
1. Open iODBC Administrator
Navigate to /Applications/iODBC folder and launch the iODBC
Administrator application.
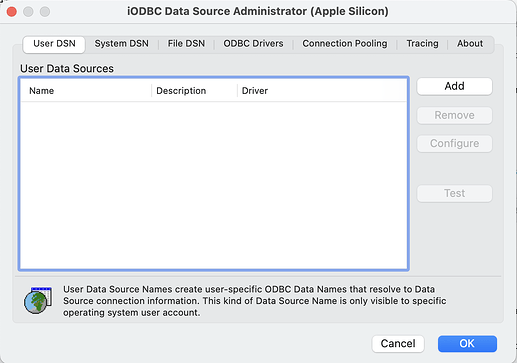
2. Add New DSN
Click the Add button.
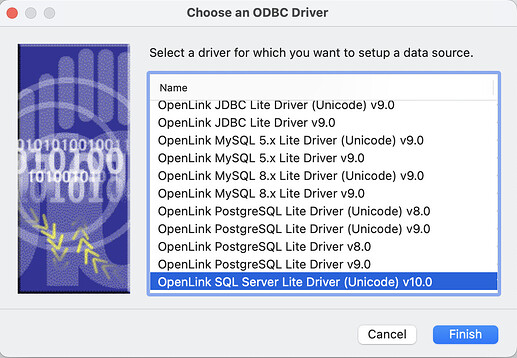
3. Select Driver
Select OpenLink SQL Server Driver (Unicode) v10.0.
4. Configure Basic Connection
Enter a name for your DSN, the Host Name of your SQL Server, the Port (default 1433), and choose the Authentication Method.
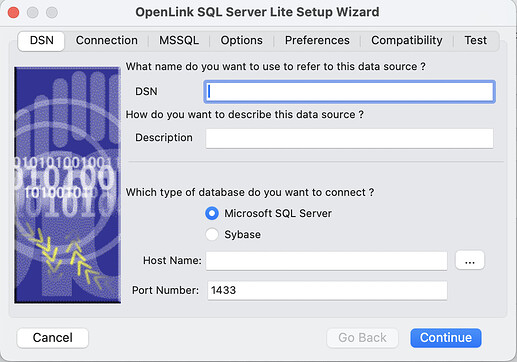
- Host Name
- The hostname or IP address on which Microsoft SQL Server listens.
- Port
- The TCP port on which Microsoft SQL Server listens.
5. Authentication Methods
Choose the SQL Server authentication method to be used.
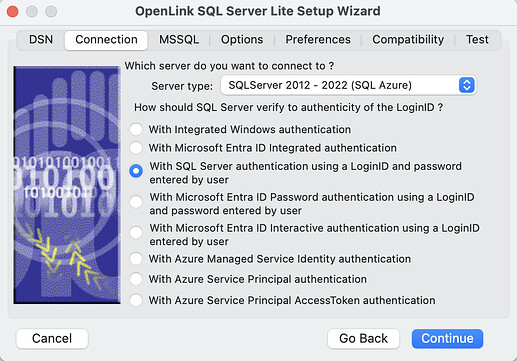
- With Integrated Windows authentication (ntlm)
- Specifies that the driver request a secure (or trusted) connection to a SQL Server. When selected, SQL Server uses integrated login security to establish connections using this data source, regardless of the current login security mode at the server. Any login ID or password supplied is ignored. The SQL Server system administrator must have associated your Windows login with a SQL Server login ID.
- With Microsoft EntraID Integrated authentication (ActiveDirectoryIntegrated)
- Specifies that the driver authenticate to SQL Server using Microsoft Entra ID. When selected, SQL Server uses Microsoft Entra integrated login security to establish a connection using this data source, regardless of the current login security mode at the server.
- With SQL Server authentication using a LoginID and password entered by user (Default)
- Specifies that the driver authenticate to SQL Server using a login ID and password.
- With Microsoft EntraID Password authentication using a LoginID and password entered by user (ActiveDirectoryPassword)
- Specifies that the driver authenticate to SQL Server using a Microsoft Entra login ID and password.
- With Microsoft EntraID Interactive authentication using a LoginID and password entered by user (ActiveDirectoryInteractive)
- Specifies that the driver authenticate to SQL Server using Microsoft Entra interactive mode by providing a login ID. This option triggers the Azure Authentication prompt dialog.
- With Azure Managed Service Identity authentication (ActiveDirectoryMsi)
- Specifies that the driver authenticate to SQL Server using a Managed Identity.
- With Azure Service Principal authentication (ActiveDirectoryServicePrincipal)
- Specifies that the driver authenticate to SQL Server using a Microsoft Entra service principal.
- With Azure Service Principal AccessToken authentication (ActiveDirectoryServicePrincipalAccessToken)
- Specify your own code for generating an AccessToken from Azure server, which can be passed
as the Password with a blank Username for connection to the database. The Azure CLI command
az account get-access-token --resource https://database.windows.net/can be used to generate an AccessToken.
6. Server Type
Choose the SQL Server Type to be connected to.
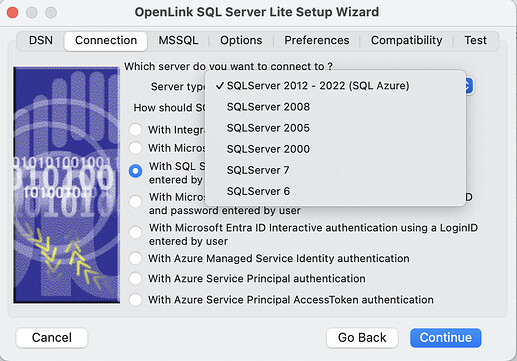
- Server Type
- An OpenLink proprietary parameter that associates the connection with a particular TDS version.
7. Connection Details
Enter Instance Name, Mirror Host, Connection Timeout, Multi Subnet Failover, and Encryption settings. You can use the "Connect now to verify" option here.

- Instance Name
- Microsoft SQL Server instance name on the specified host. A
Microsoft SQL Server instance can also be specified by appending
\InstanceNameto the ServerName (e.g.,ServerName\InstanceName). - Mirror Host
- The name of the Failover Server hosting the mirrored database if configured.
- Conn Timeout
- Connection timeout in milliseconds (msec).
- Multi Subnet Failover
- This flag switches ON SQL Server Multi Subnet Failover mode.
- Use strong encryption of data
- Enable SSL encryption of data between driver and database.
- Connect now to verify that all settings are correct
- Will attempt to connect to the database once you click Continue.
- Login ID
- A valid Microsoft SQL Server username.
- Password
- A valid Microsoft SQL Server password.
8. Advanced Options
Configure MARS, Application Readonly Intent, and SSL Certificate verification/CA File settings.
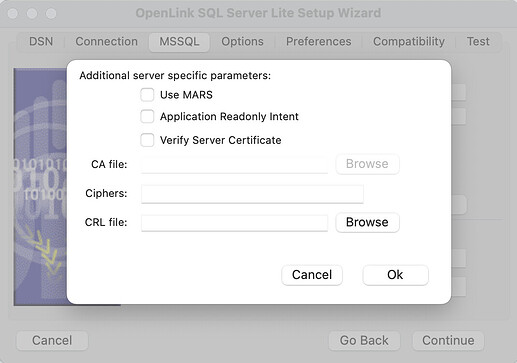
- Use Mars
- Multiple Active Result Sets enables the concurrent processing of multiple statements/queries and/or result sets on a single connection.
- Application Readonly Intent
- Application Intent is applicable to SQL Server clustered instances, and is a request for the driver to ask the SQL Server listener for connectivity to either a read only or read write node within the cluster. The driver has no control over the routing as it is the responsibility of the SQL Server listener to route the connection to one of the nodes in the Availability Group. The default is read write and this option allows it to be toggled to read only.
- Verify Server Certificate
- Verify the Database Server SSL certificate against the one specified in the “CA file” field.
- CA file
- Specify the location of a Valid SSL Certificate for use during the connection.
- Ciphers
- List of encryption algorithms used to protect data in transit.
- CRL file
- A Certificate Revocation List (CRL) file containing a list of digital certificates that have been revoked by the CA (Certificate Authority) before their scheduled expiration date.
9. Database & Packet Size
Set the default Database, Character Set, Language, and Packet Size. Configure Prepare Method and other TDS-specific options.

- Database
- The Microsoft SQL Server database.
- Character set
- The client application’s character set (8-bit only; the Unicode driver always returns UCS-2 on Windows).
- Language
- The language you want error messages returned in; must be supported by the target server.
- Packet Size
- A value that determines the number of bytes per network packet transferred from the database server to the client. The correct setting of this attribute can improve performance. When set to 0 (initial default), the driver uses the default packet size of the SQL Server configuration. When set to -1, the driver computes the maximum allowable packet size on the first connect. When set to x (integer 1-10), it indicates a multiple of 512 bytes (e.g., 6 * 512 = 3072 bytes).
- Prepare Method
- This option is specific to the TDS-based driver for Sybase & Microsoft SQL Server. It can
take the values None, Partial, or Full (
connectoptions = -O [0, 1, 2]respectively). It is used to determine whether stored procedures are created on the server for calls to SQLPrepare. More Info - No Quoted Identifiers
- This option indicates that the underlying driver does not support quoted identifiers, which is required for Jet engine based products like MS Access.
- Use ANSI nulls, padding and warnings
- This option affects TDS agent & Lite Driver connections to Microsoft SQL Server databases. Sybase connectivity is not affected. More Info
- Map Serializable to Snapshot isolation level
- Enable Snapshot transaction isolation level in the driver. Snapshot Isolation is a transaction isolation level available in Microsoft SQL Server 2005 and later.
- Show Sparse Columns in SQLColumns
- Display SQL Server Sparse Columns in ODBC
SQLColumnscall.
10. Cursors & Logging
Configure cursor behavior (Read-only, Defer fetching, Row Buffer Size) and diagnostic logging.
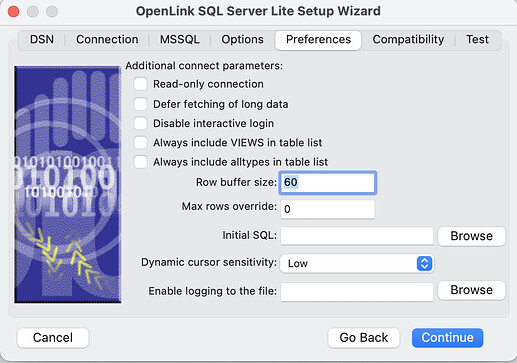
- Read-only connection
- Specifies whether the connection is “Read-only.” Must be unchecked to INSERT, UPDATE, or DELETE records, and to run some Stored Procedures.
- Defer fetching of long data
- Defers fetching of LONG (BINARY, BLOB, etc.) fields in wildcard queries. This provides significant performance increases when fields in query do not include LONG data fields.
- Disable interactive login
- Suppresses the ODBC “Username” and “Password” login dialog boxes when interacting with your ODBC DSN from within an ODBC compliant application.
- Row Buffer Size
- This attribute specifies the number of records to be delivered from the driver to the client application in a single batch. Values can range from 1 to 999.
- Max Rows Override
- Allows you to set a limit for the maximum number of rows to be returned from a query. The default value of 0 means no limit.
- Initial SQL
- Lets you specify a file containing SQL statements that will be run automatically against the database upon connection.
- Dynamic Cursor Sensitivity
- Enables or disables the row version cache used with dynamic cursors. When set to high, checksums are calculated to detect row updates. If high sensitivity is not needed, leave unchecked for improved performance.
- Enable logging to the log file
- Check the checkbox and use the associated textbox to provide the full path to a file in which to log diagnostic information.
11. Compatibility
Set compatibility options like "Enable Microsoft Jet engine options", "Disable Autocommit", and manual SQL_DBMS_NAME overrides.
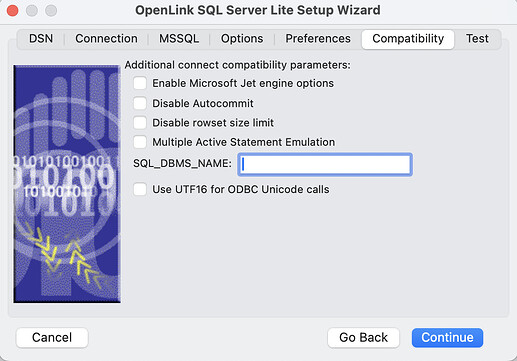
- Enable Microsoft Jet engine options
- Facilitates translation of certain data types for the Microsoft Jet Engine. Useful if money and other datatypes are mishandled.
- Disable Autocommit
- Changes the commit behavior of the OpenLink driver. The default mode is AutoCommit (box unchecked).
- Disable rowset size limit
- Disables a limitation enforced by the cursor library that prevents the driver from claiming all available memory when a resultset is very large.
- Multiple Active Statements Emulation
- Enables use of Multiple Active statements in an ODBC application even if the underlying database does not allow this, by emulation within the driver.
- SQL_DBMS_NAME
- Manually overrides the
SQLGetInfo(SQL_DBMS_NAME)response returned by the driver. This is required for products like Microsoft InfoPath for which the value should be “SQL Server”. - Use UTF-16 for ODBC Unicode calls
- Forces the driver to use UTF-16 encoding for Unicode data. This setting is specifically required for compatibility with the unixODBC Driver Manager.
12. Test Data Source
Select the Test Data Source button to make a test connection to the database.
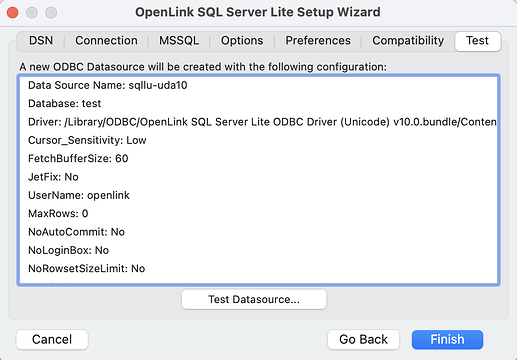
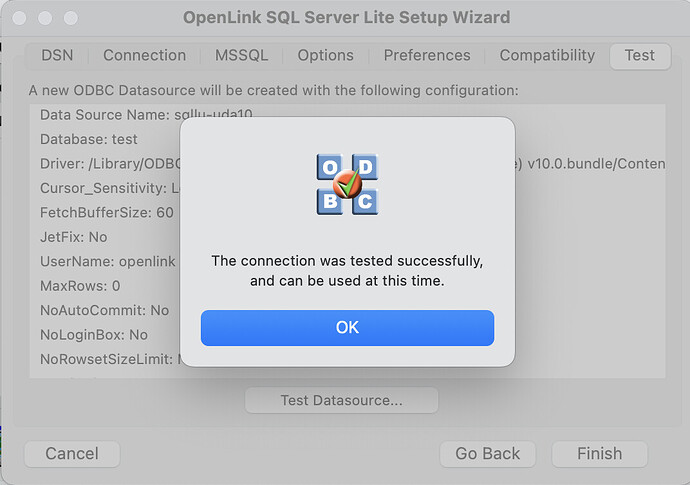
13. Success
The test connection should be successful.
14. Ready
The DSN is successfully added and ready for use.
Testing Your Connection
Follow these steps to verify the connection using the provided iODBC Demo application.
1. Open iODBC Demo
From the /Applications/iODBC folder run the iODBC Demo Unicode
sample application.
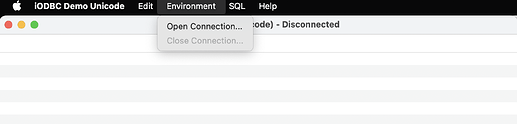
2. Open Connection Menu
Select the Environment -> Open Connection menu item.
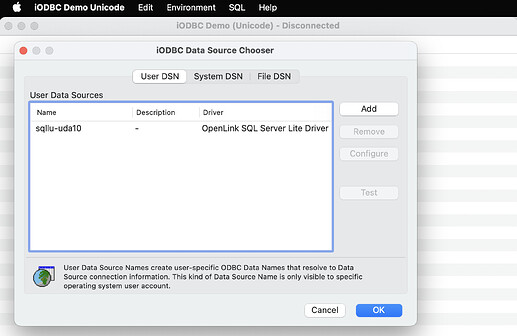
3. Select DSN
Select the ODBC DSN you created in the previous section.
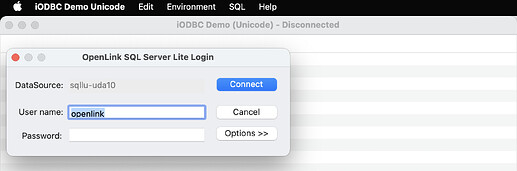
4. Login
Enter login details for the target database.
5. Execute SQL
Select the SQL -> Execute SQL menu item.

6. Run Query
Enter a valid SQL query and click the OK button to run it.

7. View Results
The query results are displayed.

Troubleshooting
If the test connection fails, verify that:
- The SQL Server machine is reachable from your Mac (try
ping <hostname>). - The firewall on the SQL Server permits traffic on port 1433.
- Your user credentials are correct for the selected Authentication Method.