

How to Install and Configure the Lite Edition ODBC Driver for Oracle, on macOS
A guide for installing the Lite Edition ODBC Driver for Oracle data sources, on macOS.
Before you install
Requirements for Oracle
What Oracle and its client software must provide before the driver connects.
Pre-Requisites for Connections to Oracle
Basic DBMS & DBMS Version Support
Database Native Client Requirements
- Understanding the Oracle native client
- When do I need the Oracle native client?
- Obtain the Oracle native client (a.k.a. "Net8", "Net9", "Net10")
- Configure the Oracle native client
Key Database Native Variables (Set Before OpenLink Install)
Database Native Settings You Need to Know
Database Configuration for Unicode
Database Configuration for XA Support
Do OpenLink drivers connect to Oracle?
Do OpenLink drivers connect to Oracle?
Yes.
OpenLink produces data access drivers that connect to Oracle.
Oracle version support
Oracle version support
OpenLink's drivers provide support for Oracle 7 onward.
Detecting the Oracle DBMS version
Detecting the Oracle DBMS version
You may use the following steps to detect your oracle version:
1.
Login to the machine which hosts your Oracle database.
2.
su to your Oracle user.
3.
execute your Oracle user's .profile.
4.
cd to ORACLE_ HOME/bin.
5.
Execute the following command: /sqplus /nolog
6.
Type: connect as sysdba
7.
Provide your Oracle DBA username and password.
8.
Execute the startup command if the instance is not running.
9.
Execute the following command: select * from V$VERSION
10.
Obtain the version output..
For example:
      $ ./sqlplus /nolog
SQL*Plus: Release 10.1.0.2.0 - Production on Thu Mar 15 12:56:19 2007
Copyright (c) 1982, 2004, Oracle.  All rights reserved.
SQL> connect as sysdba
Enter user-name: scott
Enter password:
Connected to an idle instance.
SQL> startup
ORACLE instance started.
Total System Global Area  289406976 bytes
Fixed Size                  1328912 bytes
Variable Size             262387952 bytes
Database Buffers           25165824 bytes
Redo Buffers                 524288 bytes
Database mounted.
Database opened.
SQL> select * from V$VERSION
2  ;
BANNER
----------------------------------------------------------------
Oracle Database 10g Enterprise Edition Release 10.1.0.2.0 - 64bi
PL/SQL Release 10.1.0.2.0 - Production
CORE    10.1.0.2.0      Production
TNS for IBM/AIX RISC System/6000: Version 10.1.0.2.0 - Productio
NLSRTL Version 10.1.0.2.0 - Production
Understanding the Oracle native client
Understanding the Oracle native client
The Oracle native client is an Oracle product that provides access to Oracle databases via the Oracle proprietary communications protocol. At the time of writing, this product is called Net8, Net9, or Net10 depending on the version of the database to which you want to connect. However, marketing names are subject to change.
Note: SQL*Net is the Oracle 7 database native client.
When do I need the Oracle native client?
When do I need the Oracle native client?
There are two scenarios in which you would require the Oracle native client.
You must install the Oracle client on the same machine as any Oracle Single-Tier driver.
Additionally, you must install the Oracle client on the same machine as OpenLink's Multi-Tier Request Broker and Oracle Database Agent, if the Broker and Oracle Agent do not reside on the same machine as the Oracle database.
Obtain the Oracle native client (a.k.a. "Net8", "Net9", "Net10")
Obtain the Oracle native client (a.k.a. "Net8", "Net9", "Net10")
OpenLink Software does not supply the Oracle native client. Instead, the Oracle native client should ship with the standard Oracle DBMS install media. At the time of writing, staff notes that the Oracle native client appears on CDs labeled as such. However, packaging and marketing labels are subject to change.
If you do not have the Oracle client install CD,you should visit www.oracle.com to see if the appropriate Oracle client version is available for download.
Configure the Oracle native client
Configure the Oracle native client
No configuration is needed, if you use Oracle's InstantClient product.
Use the following steps to configure the Oracle native client on Windows:
1.
Login to the machine that contains your Oracle client software.
2.
Expand the Start menu.
3.
Expand the Programs menu.
4.
Expand the Oracle folder.
5.
Expand the Configuration and Migration Tools folder.
6.
Click the Net Configuration Assistant.
7.
Select Local Net Service Name.
8.
Click Next.
9.
Select Add.
10.
Click Next.
11.
Choose your Oracle version.
12.
Provide your Oracle SID.
13.
Click Next.
14.
Select the TCP protocol.
15.
Click Next.
16.
Provide the hostname of the machine that hosts Oracle.
17.
Insure that the correct TCP port is indicated.
18.
Click Next.
19.
Test your Net Service Name.
20.
Click Next.
21.
Provide a name for your Service Name.
22.
Click Next.
23.
Click No.
24.
Click Next twice.
25.
Click Finish.
Use the following steps to configure the Oracle native client on Unix:
1.
Login to the machine that contains your Oracle database server.
2.
cd into the $ORACLE_ HOME/network/admin directory.
3.
vi tnsnames.ora.
4.
Locate the SID entry.
For example:
      ORA10G64 =
(DESCRIPTION =
(ADDRESS = (PROTOCOL = TCP)(HOST = saturn.openlinksw.com)(PORT = 1521))
(CONNECT_DATA =
(SERVER = DEDICATED)
(SERVICE_NAME = ora10g64)
)
)
5.
Login to the machine that contains the Oracle native client.
6.
su to the oracle user.
7.
Execute the oracle user's .profile.
8.
cd to $ORACLE_ HOME/network/admin.
9.
vi tnsnames.ora.
10.
Create the same entry.
ORACLE_HOME
ORACLE_HOME
The ORACLE_ HOME environment variable passes the full path to the root of the local, Oracle installation.
ORACLE_SID
ORACLE_SID
The ORACLE_ SID environment variable passes a valid Oracle SID as defined in $ORACLE_ HOME/network/admin/tnsnames.ora.
Identify the Oracle SID
Identify the Oracle SID
On Unix
1. Login to your Oracle database server.
2. su to your oracle user.
3. Execute the .profile associated with your oracle user.
4. cd into your $ORACLE_HOME/network/admin directory.
5. cat your listener.ora file.
Oracle SIDs are passed to the SID parameter.
On Windows
1. Login to your Windows database server.
2. Search your system for the Oracle listener.ora file.
3. Open the listener.ora file with Notepad.
Oracle SIDs are passed to the SID parameter.
Identify the Oracle TCP port
Identify the Oracle TCP port
On Unix
1. Login to your Oracle database server.
2. su to your oracle user.
3. Execute the .profile associated with your oracle user.
4. cd into your $ORACLE_HOME/network/admin directory.
5. cat your listener.ora file.
6. Locate your Oracle SID.
7. The port will be passed to the Port parameter associated with your Oracle SID.
On Windows
1. Login to your Windows database server.
2. Search your system for the Oracle listener.ora file.
3. Open the listener.ora file with Notepad.
4. Locate your Oracle SID.
5.
The port will be passed to the Port parameter associated with your Oracle SID.
Identify the SQL*Net or Net Service Name
On Unix
- Log in to the Oracle DBMS server.
-
su - oracle
- Execute the
ingresassociated with the oracle user.
-
cd $ORACLE_HOME/bin
- Run the
netcaprogram.
- Wait for the Welcome page to appear.
- Select "Local Net Service Name Configuration."
- Select Next.
- Select the Test option.
- Select Next.
- Use the drop-down menu to display a list of Oracle net service names available on the machine.
- Exit the utility.
On Windows
- Log in to the machine that hosts the Oracle DBMS.
- Launch the Net Configuration Assistant (Start menu >> Programs >> Oracle).
- Click the Local Net Service Name configuration radio button.
- Click Next.
- Click Test.
- Click Next.
- Use the drop-down menu to display a list of Oracle net service names available on the machine.
- Use the Cancel button to exit the utility.
Database Configuration for Unicode
Database Configuration for Unicode
Oracle 8 & 9
The Oracle 9i, 8i and 8.0 databases store Unicode data in the UTF8 encoding scheme, which is an ASCII compatible multibyte encoding for Unicode.
Database Confguration
Using the Oracle "Database Configuration Assistant" wizard, follow the options for creating a new database. Select the "custom" option when presented. This will enable you to use the "Change the Character Set" option, during the configuration of this Custom database. You want to select UTF8.
To check the character set in use by your database, execute the following query in SQL*Plus:
SQL> SELECT parameter, value FROM nls_database_parameters
WHERE parameter = 'NLS_CHARACTERSET';
PARAMETER             VALUE
------------------    ---------------------
NLS_CHARACTERSET      UTF8
SQL>.
Unicode support is dependent on the Unicode features available through the Oracle Call Interface (OCI).
OCI 8.1.5 supports inputting Unicode data into a database and retrieving Unicode data from a database.
The Following Oracle Data types can be using for storing Unicode data:
CHAR
VARCHAR
VARCHAR2
Configuring Oracle for XA support
Configuring Oracle for XA support
XA support has been tested against Oracle version 9i and 10g
Granting SELECT Privilege on V$XATRANS$ & DBA_PENDING_TRANSACTIONS Views
You must grant SELECT privilege to the V$XATRANS$ view for all Oracle accounts that XA applications will use.
Otherwise, xa_recover will fail, in the event that TM needs to perform a recovery.
If the view does not already exist in your Oracle installation, it can be manually loaded using the following SQL script which should be included in your Oracle installation:
$ORACLE_HOME/rdbms/admin/xaview.sql
The example below shows an extract from an Oracle XA Library trace file.
Oracle returns error ORA-00942 : table or view does not exist, because user scott does not have the necessary SELECT privilege on the V$XATRANS$ view.
ORACLE XA: Version 10.1.0.0.0. RM name = 'Oracle_XA'.
113956.2352:536.536.1:
xaoopen: xa_info=ORACLE_XA+Threads=true+SesTm=60+Acc=P/scott/tiger+DB=DB01BA5BF8+SQLNET=ORCL+DbgFl=0x1+LogDir=c:/,rmid=1,flags=0x0
113956.2352:536.536.1:
xaolgn_help: version#: 168821248 banner: Personal Oracle Database 10g Release 10.1.0.2.0 - Production
With the Partitioning, OLAP and Data Mining options
113956.2352:536.536.1:
xaoopen: return 0
113959.2352:536.536.1:
xaorecover: xids=0xf8f8f8, count=10, rmid=1, flags=0x1000000
113959.2352:536.536.1:
ORA-00942: table or view does not exist
113959.2352:536.536.1:
xaorecover: xaofetch rtn -3.
113959.2352:536.536.1:
xaoclose: xa_info=DSN=au49-ora10-carlv;UID=scott;PWD=tiger;+DB=DB01BA5BF8, rmid=1769209857, flags=0x0
113959.2352:536.536.1:
xaoclose: rtn 0
The syntax for adding the grant privilege to the 'scott' user is:
GRANT SELECT ON V$XATRANS$ TO scott;
In addition, the "ORA-00942: table or view does not exist" error also occurs if select privileges are not granted on the DBA_PENDING_TRANSACTIONS view, requiring the following command to be executed as a DBA user:
GRANT SELECT ON DBA_PENDING_TRANSACTIONS TO PUBLIC
Note: The V$XATRANS$ did not exist nor did the DBA_PENDING_TRANSACTIONS view have appropriate select privileges in Unix Oracle installations, although they are included in Windows installations by default.
Pre-installation Guide
Pre-Installation Requirements for Single-Tier (Lite Edition) ODBC Driver for Oracle, for macOS
- You must be able to establish a connection with your target Oracle Database using existing Oracle Client Software. If you encounter problems making a connection to your target database, please check the following settings:
- Oracle SID: Specify the Oracle System Identifier (SID) of your database.
- Oracle TCP Port: Provide the TCP port number used for communication with the Oracle database.
- Oracle SQL*Net or Net Service Name: Specify the Oracle SQL*Net or Net Service Name if required. This is only necessary when the Multi-Tier server components are not installed on the Oracle server.
- Hostname or IP address of Oracle database server: Provide the hostname or IP address of the server where your Oracle database is located.
Installation Guide
Installation of the Lite Edition (Single-Tier) ODBC Driver for Oracle 10g Data Sources, for macOS
-
Download and open the Lite Edition (Single-Tier) ODBC Driver for Oracle 10g Data Sources. It is distributed in a single disk image (
.dmg) file, which contains a Macintosh Installer package (.mpkg).-
Double-click the
.mpkgto start the installation process. -
After the driver has been installed, you will be prompted to locate a license file.
NOTE: If a correctly named file already exists in
$OPL_LICENSE_DIR,/Library/Application Support/OpenLink/Licenses/, you will not see this dialog. If the existing file is not valid (evaluation has expired, it's for a different OS, it permits insufficient processor cores, etc.), you will need to manually apply a valid license file after installation is completed.NOTE: In some environments, this dialog may be hidden by the Installer.app or other windows on your Mac. Please minimize, hide, and/or move windows until you can see and act on this dialog. If you do not answer this dialog, the installation will not complete properly, and the driver will not function as desired.
- If a license file already exists on the machine, select the 'use existing' option. (Previously generated license files may be re-downloaded from your ODS-Briefcase data space.)
- If you need to obtain a new trial or permanent license file, select the 'try or buy' option, which will load a relevant web page from which you can obtain a license file.
-
Double-click the
-
To configure an ODBC DSN, run the OpenLink iODBC Administrator located in the
/Applications/iODBCfolder:
Data Source Name Configuration Guide
Configuration of the Lite Edition (Single-Tier) ODBC Driver for Oracle 10g Data Sources, for macOS
- To configure an ODBC DSN, run the OpenLink iODBC Administrator located in the /Applications/iODBC folder.
- Click the System DSN tab.
- Click the Add button. Then, select the OpenLink Oracle Lite Driver from the list of available drivers.
- Click Finish.
- The Data Source tab prompts for information that identifies the Oracle database server and listen port.
- DSN: A brief and meaningful title for your Data Source Name
- Description: An optional description for your Data Source Name
- Oracle Directory: Provides the full path to your local Oracle or Oracle client installation
- Connection String: Your Oracle connection URL. Takes the following form:
//oracle_server_ip_address:oracle_listening_port/oracle_SID
For example:
//openhp2.OpenLinksw.com:1521/ORCL
- Click Continue.
- The Connection tab takes a combination of required and optional parameters to make a connection to the target database:
- Username: A Oracle username
- Row Buffer Size: This attribute specifies the number of records to be transported over the network in a single network hop. Values can range from 1 to 99.
- Hide Login Dialog: Suppresses the ODBC "Username" and "Password" login dialog boxes when interacting with your ODBC DSN from within an ODBC compliant application.
- Read Only connection: Specifies whether the connection is "Read-only." Make sure the checkbox is unchecked to request a "Read/Write" connection.
- OCIPrefetchRows: Sets the number of rows to be prefetched.
- OCIPrefetchMemory: Sets the memory allocated for rows to be pre-fetched.
- SQL_DBMS Name: Manually overrides the SQLGetInfo(SQL_DBMS_NAME) response returned by the driver. This is required for products like Microsoft InfoPath for which the return value should be "SQL Server".
- Click Continue to view additional preferences that can be set for the connection.
- The third tab contains settings that are not required for a basic connection:
- Initialization SQL: Lets you specify a file containing SQL statements that will be run automatically against the database upon connection.
- Cursor Sensitivity: Enables or disables the row version cache used with dynamic cursors.
- Max Rows Override: Allows you to define a limit on the maximum number of rows to be returned from a query. The default value of 0 means no limit.
- Show Remarks: Affects output from the SQLColumns() ODBC API call.
- Disable autocommit: Changes the default commit behavior of the OpenLink driver. The default mode is AutoCommit (box unchecked).
- Disable rowset size limit: Removes OpenLink's default 100 rowset restriction.
- Defer fetching of long data: Defers fetching of LONG (BINARY, BLOB, etc.) data unless explicitly requested in a query. This provides significant performance increases when fields in the query do not include LONG data fields.
- Always include VIEWS in table list:
- Always include all types in table list:
- Custom Catalogue Views: Dictates whether custom OpenLink views are used to return metadata for certain ODBC catalog functions: SQLForeignKeys(), SQLPrimaryKeys(), SQLProcedureColumns(), SQLProcedures(), and SQLSpecialColumns(). These custom views provide more metadata than is normally provided by the standard Oracle data dictionary views.
- User's own tables first in SQLTables: This option is specific to OpenLink's Oracle drivers. It prompts the SQLTables() ODBC API call to display the connected user's tables first in table lists. The default ordering is alphabetical.
- Count stored procedure parameters in SQL Procedures: This parameter is specific to the Oracle data source. It affects the output from SQLProcedures() when "Custom Catalog Views" is enabled.
- Click the Finish button to save your new Data Source Name.
Walkthrough with screenshots
Installation walkthrough with screenshots
The same installation, step by step, with the screens you will see.
Installation and Configuration of the Lite Edition (Single-Tier) ODBC Driver for Oracle 10g Data Sources, for Mac OS X
Review Preinstallation Documentation: Pre-Installation Requirements
Installation
- The Lite Edition (Single-Tier) ODBC Driver for Oracle 10g for Mac OS X is distributed in a single disk image (.dmg) file, which contains a Macintosh Installer mpkg.
- Double-click the mpkg to start the installation process.
- You will encounter a warning message that will ask you if you are sure that you want to install the software.
Click Continue.
- The installer will display a Welcome message.
Click "Continue."
- The next screen will display the Read Me file, including any last- minute updates to these documents.
Please read carefully and click "Continue" when finished.
- The next screen will display the License Agreement for the OpenLink Single-Tier Driver for ODBC.
Please read and click "Continue."
- You will be prompted to "Agree" to continue the installation or "Disagree" to abort.
- You will be asked to select a Destination Volume.
Generally, this should be your Mac OS X boot volume.
Click on the desired disk icon and then click "Continue."
- You may now choose the Easy Install, or if you are an experienced user, you may Customize which components are installed.
OpenLink generally recommends the Easy Install.
- If you have installed OpenLink or iODBC components in the past, click "Upgrade" to continue; otherwise, click "Install."
- If you chose the custom option, select which of the following components to install.
- You must have an Administration username and password to install the OpenLink driver.
Enter your Mac OS X Username and Password.
- You will be shown a graphical progress bar as the Installation progresses, followed by System Optimization.
- After the driver has been installed, you will be prompted to locate a license file.
NOTE -- If a correctly named file already exists in$OPL_LICENSE_DIR,/Library/Application Support/openlink/bin/, you will not see this dialog. If the existing file is not valid (evaluation has expired, it's for a different OS, it permits insufficient processor cores, etc.), you will need to manually apply a valid license file after installation is completed.
NOTE -- In some environments, this dialog may be hidden by the Installer.app or other windows on your Mac. Please minimize, hide, and/or move windows until you can see and act on this dialog. If you do not answer this dialog, the installation will not complete properly, and the driver will not function as desired.- If a license file already exists on the machine, select the 'use existing' option.
(Previously generated license files may be re-downloaded from your ODS-Briefcase data space.)
- If you need to obtain a new trial or permanent license file, select the 'try or buy' option, which will load a relevant web page from which you can obtain a license file.
- If a license file already exists on the machine, select the 'use existing' option.
(Previously generated license files may be re-downloaded from your ODS-Briefcase data space.)
- When the process is complete, you will be told that the software was successfully installed.
Click "Close" and your new database driver for ODBC is ready for use.
Configuration
- To configure an ODBC DSN, run the OpenLink iODBC Administrator located in the /Applications/iODBC folder:
- Click the System DSN tab:
- Click the Add button.
Then, select the OpenLink Oracle Lite Driver from the list of available drivers:
- Click Finish.
- The Data Source tab prompts for information that identifies the Oracle database server and listen port.
It also requests a name for your Data Source.
You may also supply an optional description for your Data Source Name.
- DSN - A brief and meaningful title for your Data Source Name
- Description - An optional description for your Data Source Name
- Oracle Directory - Provides the full path to your local Oracle or Oracle client installation
- Connection String - Your Oracle connection URL.
Takes the following form:
Files //oracle_server_ip_address:oracle_listening_port/oracle_SID
For example:
Files //openhp2.OpenLinksw.com:1521/ORCL
- DSN - A brief and meaningful title for your Data Source Name
- Click Continue.
- The Connection Tab takes a combination of required and optional parameters to make a connection to the target database:
- Username - A Oracle username
- Row Buffer Size - This attribute specifies the number of records to be transported over the network in a single network hop.
Values can range from 1 to 99.
- Hide Login Dialog - Suppresses the ODBC "Username" and "Password" login dialog boxes when interacting with your ODBC DSN from within an ODBC compliant application.
- Read Only connection - Specifies whether the connection is "Read-only." Make sure the checkbox is unchecked to request a "Read/Write" connection.
- OCIPrefetchRows— Sets the number of rows to be prefetched.
More
- OCIPrefetchMemory — Sets the memory allocated for rows to be pre-fetched.
The application then fetches as many rows as will fit into that much memory.
More
- SQL_DBMS Name - Manually overrides the SQLGetInfo(SQL_DBMS_NAME) response returned by the driver.
This is required for products like Microsoft InfoPath for which the return the value should be "SQL Server".
- Username - A Oracle username
- Click Continue to view additional preferences that can be set for the connection.
- Initialization SQL - Lets you specify a file containing SQL statements that will be run automatically against the database upon connection.
- Cursor Sensitivity - Enables or disables the row version cache used with dynamic cursors.
When dynamic cursor sensitivity is set high, the Cursor Library calculates checksums for each row in the current rowset and compares these with the checksums (if any) already stored in the row version cache for the same rows when fetched previously.
If the checksums differ for a row, the row has been updated since it was last fetched and the row status flag is set to SQL_ROW_UPDATED.
The row version cache is then updated with the latest checksums for the rowset.
From the user's point of view, the only visible difference between the two sensitivity settings is that a row status flag can never be set to SQL_ROW_UPDATED when the cursor sensitivity is low.
(The row status is instead displayed as SQL_ROW_SUCCESS.) In all other respects, performance aside, the two settings are the same.
Deleted rows don't appear in the rowset.
Updates to the row since the row was last fetched are reflected in the row data, and inserted rows appear in the rowset, if their keys fall within the span of the rowset.
If your application does not need to detect the row status SQL_ROW_UPDATED, you should leave the 'High Cursor Sensitivity' checkbox unchecked, as performance is improved.
The calculation and comparison of checksums for each row fetched carries an overhead.
If this option is enabled, the table oplrvc must have been created beforehand using the appropriate script for the target database.
-
Max Rows Override - Allows you to define a limit on the maximum number of rows to be returned from a query.
The default value of 0 means no limit
- Show remarks — Affects output from the
SQLColumns()ODBC API call. Use this option in conjunction with Oracle queries. When enabled, theREMARKScolumn of aSQLColumns()result set includes the comments from theCOMMENTScolumn of the OracleALL_COL_COMMENTSdata dictionary view. When disabled, theREMARKScolumn is empty. Disabling Show Remarks improves performance.
- Disable autocommit - Changes the default commit behaviour of the OpenLink driver.
The default mode is AutoCommit (box unchecked).
- Disable rowset size limit - Removes OpenLink's default 100 rowset restriction
- Defer fetching of long data - Defers fetching of LONG (BINARY, BLOB etc.) data unless explicitly requested in a query.
This provides significant performance increases when fields in query do not include LONG data fields.
- Always include VIEWS in table list -
- Always include alltypes in table list -
- Custom Catalogue Views — Dictates whether custom OpenLink views are used to return metadata for certain ODBC catalog functions:
SQLForeignKeys(),SQLPrimaryKeys(),SQLProcedureColumns(),SQLProcedures(), andSQLSpecialColumns(). These custom views provide more metadata than is normally provided by the standard Oracle data dictionary views. More
- User's own tables first in SQLTables — This option is specific to OpenLink's Oracle drivers.
It prompts the
SQLTables()ODBC API call to display the connected user's tables first in table lists. The default ordering is alphabetical.
- Count stored procedure parameters in SQL Procedures — This parameter is specific to the Oracle data source.
It affects the output from
SQLProcedures()when "Custom Catalog Views" is enabled. More
- Initialization SQL - Lets you specify a file containing SQL statements that will be run automatically against the database upon connection.
- Click the Finish button to save your new Data Source Name.
Next...
- Test your DSNs with our sample program.
- If anything isn't working as you expect, including errors resulting from the test above, see our Troubleshooting Resources.
- Should you decide to purchase a commercial license at the end of your evaluation period, be sure to consult our documentation which explains the placement and uptake of commercial license files and the use of our OpenLink License Manager technology: License Technology & Application.
Installation and Configuration of the Lite Edition (Single-Tier) ODBC Driver for Oracle 8i & 9i Data Sources, for Mac OS X
Review Preinstallation Documentation: Pre-Installation Requirements
Installation
- The Lite Edition (Single-Tier) ODBC Driver for Oracle 8i & 9i for Mac OS X is distributed in a single disk image (.dmg) file, which contains a Macintosh Installer mpkg.
- Double-click the mpkg to start the installation process.
- You will encounter a warning message that will ask you if you are sure that you want to install the software.
Click Continue.
- The installer will display a Welcome message.
Click "Continue."
- The next screen will display the Read Me file, including any last- minute updates to these documents.
Please read carefully and click "Continue" when finished.
- The next screen will display the License Agreement for the OpenLink Single-Tier Driver for ODBC.
Please read and click "Continue."
- You will be prompted to "Agree" to continue the installation or "Disagree" to abort.
- You will be asked to select a Destination Volume.
Generally, this should be your Mac OS X boot volume.
Click on the desired disk icon and then click "Continue."
- You may now choose the Easy Install, or if you are an experienced user, you may Customize which components are installed.
OpenLink generally recommends the Easy Install.
- If you have installed OpenLink or iODBC components in the past, click "Upgrade" to continue; otherwise, click "Install."
- If you chose the custom option, select which of the following components to install:
- You must have an Administration username and password to install the OpenLink driver.
Enter your Mac OS X Username and Password.
- You will be shown a graphical progress bar as the Installation progresses, followed by System Optimization.
- After the driver has been installed, you will be prompted to locate a license file.
NOTE -- If a correctly named file already exists in$OPL_LICENSE_DIR,/Library/Application Support/openlink/bin/, you will not see this dialog. If the existing file is not valid (evaluation has expired, it's for a different OS, it permits insufficient processor cores, etc.), you will need to manually apply a valid license file after installation is completed.
NOTE -- In some environments, this dialog may be hidden by the Installer.app or other windows on your Mac. Please minimize, hide, and/or move windows until you can see and act on this dialog. If you do not answer this dialog, the installation will not complete properly, and the driver will not function as desired.- If a license file already exists on the machine, select the 'use existing' option.
(Previously generated license files may be re-downloaded from your ODS-Briefcase data space.)
- If you need to obtain a new trial or permanent license file, select the 'try or buy' option, which will load a relevant web page from which you can obtain a license file.
- If a license file already exists on the machine, select the 'use existing' option.
(Previously generated license files may be re-downloaded from your ODS-Briefcase data space.)
- When the process is complete, you will be told that the software was successfully installed.
Click "Close" and your new database driver for ODBC is ready for use.
Configuration
- To configure an ODBC DSN, run the OpenLink iODBC Administrator located in the /Applications/iODBC folder:
- Click the System DSN tab:
- Click the Add button.
Then, select the OpenLink Oracle Lite Driver from the list of available drivers.
Select the Unicode version of the driver if and only if you are working with multi-byte character sets, as unnecessary translations can significantly affect ODBC performance:
- Click Finish.
- The Data Source tab prompts for information that identifies the Oracle database server and listen port.
It also requests a name for your Data Source.
You may also supply an optional description for your Data Source Name.
- DSN - A brief and meaningful title for your Data Source Name
- Description - An optional description for your Data Source Name
- Oracle Directory - Provides the full path to your local Oracle or Oracle client installation
- Net Service Name - Uses a combination of parameters to identify the target Oracle SID.
Click the Advanced tab to properly configure this setting.
- DSN - A brief and meaningful title for your Data Source Name
- Click the Advanced tab to continue.
Then, supply these values:
- Net Service -
- Hostname - The hostname on which the Oracle DBMS runs
- Port number - The TCP port on which Oracle listens
- Service name/SID - The Oracle SID name
- Use Oracle 8k Release 8.0 Compatible Identification -
- Net Service -
- Click Add.
Then, click OK to continue.
- The Connection Tab takes a combination of required and optional parameters required to make a connection to the target database:
- Username - An Oracle username
- Row Buffer Size - This attribute specifies the number of records to be transported over the network in a single network hop.
Values can range from 1 to 99.
- Hide Login Dialog - Suppresses the ODBC "Username" and "Password" login dialog boxes when interacting with your ODBC DSN from within an ODBC compliant application.
- Read Only connection - Specifies whether the connection is "Read-only." Make sure the checkbox is unchecked to request a "Read/Write" connection.
- OCIPrefetchRows - Sets the number of rows to be prefetched.
- OCIPrefetchMemory (bytes) - Sets the amount of memory to be allocated for rows to be prefetched.
- SQL_DBMS Name - Manually overrides the SQLGetInfo(SQL_DBMS_NAME) response returned by the driver.
This is required for products like Microsoft InfoPath for which the return the value should be "SQL Server".
- Username - An Oracle username
- Click Continue.
- Click Continue to view additional preferences that can be set for the connection.
- Initialization SQL - Lets you specify a file containing SQL statements that will be run automatically against the database upon connection.
- Cursor Sensitivity - Enables or disables the row version cache used with dynamic cursors.
When dynamic cursor sensitivity is set high, the Cursor Library calculates checksums for each row in the current rowset and compares these with the checksums (if any) already stored in the row version cache for the same rows when fetched previously.
If the checksums differ for a row, the row has been updated since it was last fetched and the row status flag is set to SQL_ROW_UPDATED.
The row version cache is then updated with the latest checksums for the rowset.
From the user's point of view, the only visible difference between the two sensitivity settings is that a row status flag can never be set to SQL_ROW_UPDATED when the cursor sensitivity is low.
(The row status is instead displayed as SQL_ROW_SUCCESS.) In all other respects, performance aside, the two settings are the same.
Deleted rows don't appear in the rowset.
Updates to the row since the row was last fetched are reflected in the row data, and inserted rows appear in the rowset, if their keys fall within the span of the rowset.
If your application does not need to detect the row status SQL_ROW_UPDATED, you should leave the 'High Cursor Sensitivity' checkbox unchecked, as performance is improved.
The calculation and comparison of checksums for each row fetched carries an overhead.
If this option is enabled, the table oplrvc must have been created beforehand using the appropriate script for the target database.
- MaxRows Override - Allows you to define a limit on the maximum number of rows to be returned from a query.
The default value of 0 means no limit
- Show Remarks - When enabled, the REMARKS column of a SQLColumns resultset includes the comments from the COMMENTS column of the Oracle ALL_COL_COMMENTS data dictionary view.
When disabled, the REMARKS column is empty.
- Disable AutoCommit - Changes the default commit behaviour of the OpenLink driver.
The default mode is AutoCommit (box unchecked).
- Disable rowset size limit - Removes OpenLink's default 100 rowset restriction
- Defer fetching of long data - Defers fetching of LONG (BINARY, BLOB etc.) data unless explicitly requested in a query.
This provides significant performance increases when fields in query do not include LONG data fields.
- Custom catalog views - "Custom Catalog Views" dictates whether custom OpenLink views are used to return metadata for certain ODBC catalog functions; SQLForeignKeys, SQLPrimaryKeys, SQLProcedureColumns, SQLProcedures, and SQLSpecialColumns.
These custom views provide more metadata than is normally provided by the standard Oracle data dictionary views.
(More)
- User's own tables first in SQLTables - This option is specific to OpenLink's Oracle drivers.
It prompts the SQLTables ODBC API call to display the connected user's tables first in table lists.
The default ordering is alphabetical.
- Empty string isn't NULL behavior -
- Count stored procedures parameters in SQLProcedures - This parameter is specific to the Oracle datasource.
It affects the output from SQLProcedures when "Custom Catalog Views" is enabled.
(More)
- Initialization SQL - Lets you specify a file containing SQL statements that will be run automatically against the database upon connection.
- Click the Finish button to save your new Data Source Name.
Next...
- Test your DSNs with our sample program.
- If anything isn't working as you expect, including errors resulting from the test above, see our Troubleshooting Resources.
- Should you decide to purchase a commercial license at the end of your evaluation period, be sure to consult our documentation which explains the placement and uptake of commercial license files and the use of our OpenLink License Manager technology: License Technology & Application.
Installation and Configuration of the Lite Edition (Single-Tier) ODBC Driver for Oracle 11g & 12c Data Sources, for Mac OS X
Review Preinstallation Documentation: Pre-Installation Requirements
Installation
- The Lite Edition (Single-Tier) ODBC Drivers for Oracle 11g & 12c for Mac OS X are distributed in a single disk image (.dmg) file, which contains a Macintosh Installer mpg.
This documentation assume Oracle 12c is in use, but exactly the same applies for Oracle 11g.
- Double-click the mpkg to start the installation process.
- The installer will display a Welcome message.
Click "Continue."
- The next screen will display the Read Me file, including any last- minute updates to these documents.
Please read carefully and click "Continue" when finished.
- The next screen will display the License Agreement for the OpenLink Single-Tier Driver for ODBC.
Please read and click "Continue."
- You will be prompted to "Agree" to continue the installation or "Disagree" to abort.
- You will be asked to select a Destination Volume.
Generally, this should be your Mac OS X boot volume.
Click on the desired disk icon and then click "Continue."
- You may now choose the Easy Install, or if you are an experienced user, you may Customize which components are installed.
OpenLink generally recommends the Easy Install.
- If you have installed OpenLink or iODBC components in the past, click "Upgrade" to continue; otherwise, click "Install."
- If you chose the custom option, select which of the following components to install.
- You must have an Administration username and password to install the OpenLink driver.
Enter your Mac OS X Username and Password.
- You will be shown a graphical progress bar as the Installation progresses, followed by System Optimization.
- After the driver has been installed, you will be prompted to locate a license file.
NOTE -- If a correctly named file already exists in$OPL_LICENSE_DIR,/Library/Application Support/OpenLink/Licenses/, you will not see this dialog. If the existing file is not valid (evaluation has expired, it's for a different OS, it permits insufficient processor cores, etc.), you will need to manually apply a valid license file after installation is completed.
NOTE -- In some environments, this dialog may be hidden by the Installer.app or other windows on your Mac. Please minimize, hide, and/or move windows until you can see and act on this dialog. If you do not answer this dialog, the installation will not complete properly, and the driver will not function as desired.- If a license file already exists on the machine, select the 'use existing' option.
(Previously generated license files may be re-downloaded from your ODS-Briefcase data space.)
- If you need to obtain a new trial or permanent license file, select the 'try or buy' option, which will load a relevant web page from which you can obtain a license file.
- If a license file already exists on the machine, select the 'use existing' option.
(Previously generated license files may be re-downloaded from your ODS-Briefcase data space.)
- When the process is complete, you will be told that the software was successfully installed.
Click "Close" and your new database driver for ODBC is ready for use.
Configuration
- To configure an ODBC DSN, run the OpenLink iODBC Administrator located in the /Applications/iODBC folder:
Note - Either the "iODBC Administrator" or "iODBC Administrator 64" programs can be used, as the driver is a "universal" bundle containing both a 32bit and 64bit driver as part of the single universal binary and the appropriate executable format will be loaded to match the program calling it.
- Click the System DSN tab:
- Click the Add button.
Then, select the OpenLink Oracle Lite Driver from the list of available drivers:
- Click Finish.
- The Data Source tab requests a name for your Data Source and you may also supply an optional description for your Data Source Name.
- DSN - A brief and meaningful title for your Data Source Name
- Description - An optional description for your Data Source Name
- DSN - A brief and meaningful title for your Data Source Name
- Click Continue.
- The Connection Tab prompts the required Hostname, Port Number and Service name of the target Oracle Database.
Along with the username and option password, which can be used to make a test connection to the database for verification of the parameters being passed when the "Connect now to verify all settings are correct" check box option is selected:
- Hostname - Hostname of the Oracle Database Server instance
- Port - Port Number the Oracle Database server is running (1521 by default)
- Service - Service name of the Oracle instance running on the Database Server connection require to
- Protocol - The network protocol to be used for connection, which is TCP by default
- Advanced - Enables addition Oracle Instant Client connection parameters to be passed if required
- User name - The user name to connect as
- Password - The password for the specified user
- Hostname - Hostname of the Oracle Database Server instance
- The Options Tab allows additional Oracle database and optional parameters to be passed:
- OCIPrefetchRows— Sets the number of rows to be prefetched.
More
- OCIPrefetchMemory — Sets the memory allocated for rows to be pre-fetched.
The application then fetches as many rows as will fit into that much memory.
More
- Custom Catalogue Views — Dictates whether custom OpenLink views are used to return metadata for certain ODBC catalog functions:
SQLForeignKeys(),SQLPrimaryKeys(),SQLProcedureColumns(),SQLProcedures(), andSQLSpecialColumns(). These custom views provide more metadata than is normally provided by the standard Oracle data dictionary views. More
- Count stored procedure parameters in SQL Procedures — This parameter is specific to the Oracle data source.
It affects the output from
SQLProcedures()when "Custom Catalog Views" is enabled. More
- User's own tables first in SQLTables — This option is specific to OpenLink's Oracle drivers.
It prompts the
SQLTables()ODBC API call to display the connected user's tables first in table lists. The default ordering is alphabetical.
- Show remarks — Affects output from the
SQLColumns()ODBC API call. Use this option in conjunction with Oracle queries. When enabled, theREMARKScolumn of aSQLColumns()result set includes the comments from theCOMMENTScolumn of the OracleALL_COL_COMMENTSdata dictionary view. When disabled, theREMARKScolumn is empty. Disabling Show Remarks improves performance.
- Empty string isn't NULL behavior — This parameter forces the driver to differentiate between an Empty string and a
NULL, which Oracle does not do by default.
- Show synonyms in catalog functions — This parameter return Oracle Table Synonyms in Catalog calls like
SQLTables().
- OCIPrefetchRows— Sets the number of rows to be prefetched.
More
- Click Next to continue.
- The TAF Tab enables you to set parameters specific to Transparent Application Failover:
- Enable TAF — Instructs the driver to attempt multiple failover connections to alternative DBMS nodes per the Oracle TAF specification.
More
- Maximum Retries — The maximum number of times that the driver will retry the connection.
- Retry Interval (secs) — The number of seconds that the driver will wait between connection attempts.
- Enable OCI Connection Pooling — Check to create a separate connection pool for each Oracle instance to which you connect.
- Minimum Pool Size — The minimum number of connections to be opened when the pool is created.
- Maximum Pool Size — The maximum number of connections that can be opened in the pool.
- Increment — The incremental number of connections to be opened when all the connections are busy and a call needs a connection.
- Linger time — The amount of time to wait for a connection when all connections are busy and the maximum number of open connections has been reached.
- Wait for free connection — The length of time the last connection in the pool should linger before the pool is destroyed.
- Enable TAF — Instructs the driver to attempt multiple failover connections to alternative DBMS nodes per the Oracle TAF specification.
More
- Click Next to continue.
- The Preferences Tab enables you to set parameters specific to OCI Connection Pooling:
- Read-only connection — Specifies whether the connection is "Read-only." Must be unchecked to
INSERT,UPDATE, orDELETErecords, and to run some Stored Procedures including some built-in functions.
- Defer fetching of long data — Defers fetching of
LONG(BINARY,BLOB, etc.) fields in wildcard queries. This provides significant performance increases when fields in query do not include LONG data fields.
- Disable interactive login — Suppresses the ODBC "Username" and "Password" login dialog boxes when interacting with your ODBC DSN from within an ODBC compliant application.
- Row Buffer Size — This attribute specifies the number of records to be transported over the network in a single network hop.
Values can range from 1 to 999.
- Max rows Override — Allows you to set a limit for the maximum number of rows to be returned from a query.
The default value of 0 means no limit.
- Initial SQL — Lets you specify a file containing SQL statements that will be run automatically against the database upon connection.
- Dynamic Cursor Sensitivity — Enables or disables the row version cache used with dynamic cursors.
When dynamic cursor sensitivity is set high, the Cursor Library calculates checksums for each row in the current rowset and compares these with the checksums (if any) already stored in the row version cache for the same rows when fetched previously.
If the checksums differ for a row, the row has been updated since it was last fetched and the row status flag is set to
SQL_ROW_UPDATED. The row version cache is then updated with the latest checksums for the rowset. From the user's point of view, the only visible difference between the two sensitivity settings is that a row status flag can never be set toSQL_ROW_UPDATEDwhen the cursor sensitivity is low. (The row status is instead displayed asSQL_ROW_SUCCESS.) In all other respects, performance aside, the two settings are the same. Deleted rows don't appear in the rowset. Updates to the row since the row was last fetched are reflected in the row data, and inserted rows appear in the rowset, if their keys fall within the span of the rowset. If your application does not need to detect the row statusSQL_ROW_UPDATED, you should leave the High Cursor Sensitivity checkbox unchecked, as performance is improved. The calculation and comparison of checksums for each row fetched carries an overhead. If this option is enabled, the tableoplrvcmust have been created beforehand using the appropriate script for the target database.
- Enable logging to the log file — Check the checkbox and use the associated textbox to provide the full path to a file in which to log diagnostic information.
- Read-only connection — Specifies whether the connection is "Read-only." Must be unchecked to
- Click Next to continue.
- The Compatibility Tab enables you to set additional parameters to enhance compatibility with applications:
- Enable Microsoft Jet engine options — Facilitates translation of certain data types for the Microsoft Jet Engine.
If you notice that money and other datatypes are mishandled with Microsoft or other applications, test with Jet fix enabled.
- Disable Autocommit — Changes the commit behavior of the OpenLink driver.
The default mode is AutoCommit (box unchecked).
- Disable rowset size limit — Disables a limitation enforced by the cursor library.
This limitation is enforced by default.
It prevents the driver from claiming all available memory when a resultset (typically generated by an accidental query) is very large.
The limit is not normally reached.
- Multiple Active Statements Emulation — Enables use of Multiple Active statements in an ODBC application even if the underlying database does not allow this,, by emulation within the driver.
- SQL_DBMS Name — Manually overrides the
SQLGetInfo(SQL_DBMS_NAME)response returned by the driver. This is required for products like Microsoft InfoPath for which the value should be "SQL Server".
- Enable Microsoft Jet engine options — Facilitates translation of certain data types for the Microsoft Jet Engine.
If you notice that money and other datatypes are mishandled with Microsoft or other applications, test with Jet fix enabled.
- Click Next to continue.
- The Test Tab enables you to text your Data Source.
Click the Test Data Source button.
Next...
- Test your DSNs with our sample program.
- If anything isn't working as you expect, including errors resulting from the test above, see our Troubleshooting Resources.
- Should you decide to purchase a commercial license at the end of your evaluation period, be sure to consult our documentation which explains the placement and uptake of commercial license files and the use of our OpenLink License Manager technology: License Technology & Application.
Configuration and upgrades
Creating and testing data sources
Creating DSNs and trying a connection, with screenshots.
Additional Reading
Additional Reading
Create File DSNs
This format of ODBC DSN enables the creation of centralized ODBC DSNs on a designated NT or Windows 95 Server machine, thereby reducing the administrative overhead of ODBC DSN configuration for every single machine within your infrastructure.
The steps for creating an ODBC File DSN are as follows:
1. Select the File DSN Tab from the ODBC Driver Manger. Press the Add button.
Figure: 1.
File Data Sources
2. Pick the ODBC Driver to be used to create your ODBC DSN, in the case of the OpenLink Universal Data Access Driver Suite 5.0, this would be the Driver identified below as "OpenLink Generic ODBC Driver".
Figure: 2.
Data Source Configuration
3. Enter a name that describes your File DSN (e.g. "Sales by Region" as depicted below) for future use when interacting with it from ODBC compliant application and environments. At present to get full compatability within the Admin Assistant, you must end your dsn name with the extension ".dsn". So for this example the DSN name would be "Sales by Region.dsn".
Figure: 3.
File Data Sources
4. Verify the displayed paramters are correct, and confirm by hitting Finish button.
Figure: 4.
File Data Sources
5. Enter a Description and define the location of the server either by selection, or enter it manually.
Note the name is not defined here as the filename defines the DSN.
Figure: 5.
File Data Sources
6. Complete the fields of the ODBC File DSN. Enter Domain, Database, Server. See above for details of each.
The File DSN must be verified immediately, so the Login ID and password are required. The Next button will be disabled until login details are provided.
Figure: 6.
File Data Sources
7. Complete the fields for additional connection parameters.
Figure: 7.
Data Source Configuration
8. This concludes the File DSN generation. The DSN will appear in the list under the File DSN Tab of the ODBC Driver Manger.
Figure: 8.
File Data Sources
Bench Testing ODBC Drivers
Bench Testing ODBC Drivers
ODBC Bench Test is a 32 Bit C++ program based on the industry standard TPC-A benchmark (we will be extending this program to include the TPC-C and TPC-D benchmarks also). This program helps you compare the performance of Virtuoso against other backend database engines as well as compare the performance of various ODBC Drivers connecting to any ODBC compliant backend database.
1.
Go to the OpenLink Data Access Drivers "Start Menu" item, then click on the "ODBC Bench Test 32 Bit" menu item.
You will be presented with the "Bench Test" interface.
Figure: 1
2. Follow the File->Connect menu path which initializes the ODBC Driver Manager, which in turn presents you with a list of ODBC DSNs installed on your machine. Select the DSN that you want to benchmark, remember that by benchmarking a DSN you are benchmarking the ODBC Driver that serves the DSN in question and the backend database engine that serves the ODBC Driver. Choose the name of the datasource you want to benchmark.
Figure: 2
3. You will then be presented with a Login Dialog by the OpenLink Generic Driver for ODBC, enter a valid user name and password into the appropriate fields.
Figure: 3
4. Now follow the Bench-->Load Tables menu path and you will be presented with a dialog that enables you to configure key elements of your benchmark. Click the "Execute" button to commence the process of setting up your database for the benchmark tests. Please make sure you select the appropriate schema for the DBMS that you are connecting to so that the benchmark tables are created properly.
Figure: 4
5. As the process of loading data occurs, all the way up to completion, the benchmark program will provide status information into the benchmark output pane as shown below:
Figure: 5
6. Now that all the benchmark data has been loaded into your database, follow the Bench-->Run Benchmark menu path and then configure your actual benchmark session parameters:
These benchmark parameters fall into 3 categories, Timing Options, SQL Options, and Execution Options.
Figure: 6
Timing Options:
These setting allow you to configure the duration related aspects of this benchmark program
Minutes
this is the duration of each benchmark run
Runs
this controls how many iterations of the benchmarks you actually run (the default is one benchmark iteration with a duration of 5 minutes)
SQL Options:
These settings allow you to configure how your benchmark's SQL instructions are actually handled.
ExecDirect with SQL Text
this means that no form of repetitive SQL execution optimization is being applied (SQL statements are prepared and executed repetitively)
Prepare/Execute Bound Params
this means that the Parameter Binding SQL execution optimization is being applied (SQL is prepared once but executed many times without the overhead of re-preparing statements prior to execution)
Use Stored Procedures
this means that the Stored Procedure SQL optimization is being applied (benchmark instructions are stored within database being benchmarked)
Execution Options:
These settings allow you to configure the tone of your benchmark, for instance it could have Transaction scoping and a mix of record retrieval queries, or it could simply be input and update intensive with a minimal amount of record retrieval queries (the case when the 100 row query checkbox is unchecked a typical OLTP scenario)
Asynchronous
execute the benchmark instructions asynchronously
Use Transactions
make the benchmark use transaction control (instructions are scoped to transaction blocks)
Do 100 row Query
perform a simulation of a 100 record retrieval as part of the benchmark activity.
7. Click on the "Run All" button if you would like all the different benchmark type combinations to be performed.
8. When benchmark run complete benchmark data is written to the benchmark program's output pane.
Figure: 7
The key pieces of benchmark data that you need to look out for are:
Total Transactions
total number of transactions completed during the benchmark run
Transactions Per Second
number of transaction completed per second for the benchmark run
Information from this benchmark is automatically written to an Excel format CSV (the file c:\odbcbnch.csv) which makes it easy for you to graph and pivot data collated from several benchmark runs. A later version of this demo will actually write the benchmark data into an ODBC DSN that you provide thereby offering even more flexibility and accessibility to benchmark data.
Advanced configuration for Oracle
Optional features of the Oracle drivers, each with its own settings.
Configure Oracle Connection Pooling
Configure Oracle Connection Pooling
Use the following instructions to configure Oracle Connection Pooling:
Single-Tier (Lite) Windows
1. Log in to the machine that hosts OpenLink's Single-Tier (Lite Drivers).
2. Launch your ODBC Data Sources Administrator.
3. Locate your OpenLink DSN.
4. Click the Configure button.
5. Scroll through the configuration screens until you find the "Enable OC Connection Pooling" checkbox.
6. Check the Pooling checkbox to create a separate connection pool for each Oracle instance to which you connect.
7. Configure the rest of the fields related to Pooling:
- Minimum Pool Size - The minimum number of connections to be opened when the pool is created.
- Maximum Pool Size - The maximum number of connections that can be opened in the pool.
- Increment - The incremental number of connections to be opened when all the connections are busy and a call needs a connection.
- Linger time - The amount of time to wait for a connection when all connections are busy and the maximum number of open connections has been reached.
- Wait for free connection - The length of time the last connection in the pool should linger before the pool is destroyed.
Making Connections through the Oracle Instant Client
Our Single-Tier "Lite" Edition drivers and Multi-Tier "Enterprise" Edition database agents can communicate with remote Oracle databases through the Oracle Instant Client libraries.
Instant Client allows you to run applications without installing the full Oracle client (SQL*Net or Net8/9/10/11) or having an ORACLE_HOME.
It supports two basic connection string formats:
-
[username[:password]@]//host[:port][/service name], e.g.//dbase-server-5:4321/ORDERS
- an Oracle Net keyword-value pair such as
      (DESCRIPTION=(ADDRESS=(PROTOCOL=tcp) (HOST=dlsun242)
          (PORT=5521)) (CONNECT_DATA=(SERVICE_NAME=bjava21)))
Naming methods that use a configuration file (such as tnsnames.ora or sqlnet.ora) for name translation are also possible, if the environment variable TNS_ADMIN is set to point to the directory containing the file.
Oracle documentation:
Additionally, the ORACLE_HOME and relevant library path variables must point to the root of the Oracle Instant Client installation.
These variables appear in the environment and various configuration files.
Follow the instructions appropriate to your driver and OS, to ensure that your environment and configuration files are properly configured.
Single-Tier
Single-Tier on a Unix-like OS
- Log in to your client machine.
- Use the sh or bash command to open a bourne or bash shell.
- cd into the root of your Single-Tier driver installation.
- Execute this command:
. ./openlink.sh
- Execute this command:
echo $ORACLE_HOME
- Use export to set
ORACLE_HOMEto the root of your local Instant Client Installation, as needed.
- Use the echo command to display your library path.
For example:
- AIX:
echo $LIBPATH
- HP-UX:
echo $SHLIB_PATH
- Other:
echo $LD_LIBRARY_PATH
- AIX:
- Use export to append the root of the Instant Client installation to your library path, as needed.
- cd into the bin sub-directory of your Single-Tier driver installation.
- Use a text editor to open the
openlink.inifile.
- Locate the
[Environment Oracle]section that applies to you. For example:
INI [Environment Oracle 9.x] ORACLE_HOME = /dbs3/oracle/oracle9i/32bit/v9.2.0.1.0 ORACLE_SID = ora9264 ;ORACLE_SERVER = T ;TWO_TASK = P: ;ODBC_CATALOGS = Y ; Uncomment after loading odbccat9.sql ;MULTIPLEX_LDA = 5 ; Allow 5 OpenLink clients on a single lda ;OPL_USR_TBLS_FIRST = Y ; Sort SQLTables starting with user tables SHOW_REMARKS = N ; Retrieve SQLColumns REMARKS field CURSOR_SENSITIVITY = LOW ; Set to HIGH after loading odbccat9.sql ;OCI_PREFETCH_ROWS = 100 ; Number of rows to prefetch ;OCI_PREFETCH_MEMORY = 65535 ; Amount of memory to use for prefetching ;NLS_LANG = AMERICAN_AMERICA.UTF8 ; Unicode connection [Environment Oracle 10.x] ORACLE_HOME = /dbs3/oracle/instantclient_10_2 ORACLE_SID = ora10g64 ;ORACLE_SERVER = T ;TWO_TASK = P: ;ODBC_CATALOGS = Y ; Uncomment after loading odbccat10.sql ;MULTIPLEX_LDA = 5 ; Allow 5 OpenLink clients on a single lda ;OPL_USR_TBLS_FIRST = Y ; Sort SQLTables starting with user tables SHOW_REMARKS = N ; Retrieve SQLColumns REMARKS field CURSOR_SENSITIVITY = LOW ; Set to HIGH after loading odbccat10.sql ;OCI_PREFETCH_ROWS = 100 ; Number of rows to prefetch ;OCI_PREFETCH_MEMORY = 65535 ; Amount of memory to use for prefetching ;NLS_LANG = AMERICAN_AMERICA.UTF8 ; Unicode connection
- Pass the root of your Instant Client installation as
ORACLE_HOME.
- Save your changes and exit the file.
Single-Tier on Windows
- Log in to your client machine.
- Expand the Windows Control Panel.
- Locate the System utility.
- Click on the Advanced tab.
- Click the Environment button.
- Scroll through the User and System variables.
- Set an ORACLE_HOME variable that points to the root of the local Instant Client installation, if it does not exist.
- Add the root of the Instant Client installation to PATH, if it is not already present.
- Exit the System utility.
Multi-Tier
Multi-Tier with Oracle Database Agent on a Unix-like OS
- Log in to the machine that contains your Multi-Tier server components.
- Use the sh or bash command to open a bourne or bash shell.
- cd into the root of your Multi-Tier installation.
- Execute this command:
. ./openlink.sh
- Execute this command:
echo $ORACLE_HOME
- Use export to set
ORACLE_HOMEto the root of your local Instant Client Installation, as needed.
- Use the echo command to display your library path.
For example:
- AIX:
echo $LIBPATH
- HP/UX:
echo $SHLIB_PATH
- Other:
echo $LD_LIBRARY_PATH
- AIX:
- Use export to append the root of the Instant Client installation to your library path, as needed.
- cd into the bin sub-directory of your Multi-Tier installation.
- Use a text editor to open the
oplrqb.inifile.
- Locate the
[Environment ORACLE]section that applies to you. For example:
INI [Environment ORACLE90] ORACLE_HOME = /dbs3/oracle/oracle9i/32bit/v9.2.0.1.0 ORACLE_SID = ora9264 ;ORACLE_SERVER = T ;TWO_TASK = P: ;ODBC_CATALOGS = Y ; Uncomment after loading odbccat9.sql ;MULTIPLEX_LDA = 5 ; Allow 5 OpenLink clients on a single lda ;OPL_USR_TBLS_FIRST = Y ; Sort SQLTables starting with user tables SHOW_REMARKS = N ; Retrieve SQLColumns REMARKS field CURSOR_SENSITIVITY = LOW ; Set to HIGH after loading odbccat9.sql ;OCI_PREFETCH_ROWS = 100 ; Number of rows to prefetch ;OCI_PREFETCH_MEMORY = 65535 ; Amount of memory to use for prefetching LD_LIBRARY_PATH = /dbs3/oracle/oracle9i/32bit/v9.2.0.1.0/lib ;SHLIB_PATH = ;LIBPATH = /dbs/oracle81/lib ; Find AIX shared libraries ;NLS_LANG = AMERICAN_AMERICA.UTF8 ; Uncomment for Unicode connections [Environment ORACLE100] ORACLE_HOME = /dbs3/oracle/instantclient_10_2 ORACLE_SID = ora10g64 ;ORACLE_SERVER = T ;TWO_TASK = P: ;ODBC_CATALOGS = Y ; Uncomment after loading odbccat10.sql ;MULTIPLEX_LDA = 5 ; Allow 5 OpenLink clients on a single lda ;OPL_USR_TBLS_FIRST = Y ; Sort SQLTables starting with user tables SHOW_REMARKS = N ; Retrieve SQLColumns REMARKS field CURSOR_SENSITIVITY = LOW ; Set to HIGH after loading odbccat10.sql ;OCI_PREFETCH_ROWS = 100 ; Number of rows to prefetch ;OCI_PREFETCH_MEMORY = 65535 ; Amount of memory to use for prefetching ;LD_LIBRARY_PATH = /dbs/oracle100/lib ; Find shared libraries ;SHLIB_PATH = /dbs/oracle100/lib ; Find HP/UX shared libraries ;LIBPATH = /dbs/oracle100/lib ; Find AIX shared libraries ;NLS_LANG = AMERICAN_AMERICA.UTF8 ; Uncomment for Unicode connections
- Pass the root of your Instant Client installation to
ORACLE_HOME.
- Pass the root of your Instant Client installation to the relevant library path variable.
- Ensure no semicolon appears in front of the relevant library path variable.
- Save your changes and exit the file.
- Start or restart the OpenLink Request Broker service.
For example:
Shell ./oplshut -fy ./oplrqb +loglevel 7 +logfile oplrqb.log
Multi-Tier with Oracle Database Agent on a Windows host
- Log in to the machine that contains your Multi-Tier server components installation.
- Expand the Windows Control Panel.
- Locate the System utility.
- Click on the Advanced tab.
- Click the Environment button.
- Scroll through the User and System variables.
- Set an
ORACLE_HOMEvariable that points to the root of the Instant Client installation, if it does not exist.
- Add the root of the Instant Client installation to
PATH, if it is not already present.
- Exit the System utility.
- Use Notepad to open the
oplrqb.inifile that appears in the bin sub-directory of the Multi-Tier installation.
- Locate the
[Environment ORACLE]section that applies to you. For example:
INI [Environment ORACLE90] ORACLE_HOME = /dbs3/oracle/oracle9i/32bit/v9.2.0.1.0 ORACLE_SID = ora9264 ;ORACLE_SERVER = T ;TWO_TASK = P: ;ODBC_CATALOGS = Y ; Uncomment after loading odbccat9.sql ;MULTIPLEX_LDA = 5 ; Allow 5 OpenLink clients on a single lda ;OPL_USR_TBLS_FIRST = Y ; Sort SQLTables starting with user tables SHOW_REMARKS = N ; Retrieve SQLColumns REMARKS field CURSOR_SENSITIVITY = LOW ; Set to HIGH after loading odbccat9.sql ;OCI_PREFETCH_ROWS = 100 ; Number of rows to prefetch ;OCI_PREFETCH_MEMORY = 65535 ; Amount of memory to use for prefetching LD_LIBRARY_PATH = /dbs3/oracle/oracle9i/32bit/v9.2.0.1.0/lib ;SHLIB_PATH = ;LIBPATH = /dbs/oracle81/lib ; Find AIX shared libraries ;NLS_LANG = AMERICAN_AMERICA.UTF8 ; Uncomment for Unicode connections [Environment ORACLE100] ORACLE_HOME = /dbs3/oracle/instantclient_10_2 ORACLE_SID = ora10g64 ;ORACLE_SERVER = T ;TWO_TASK = P: ;ODBC_CATALOGS = Y ; Uncomment after loading odbccat10.sql ;MULTIPLEX_LDA = 5 ; Allow 5 OpenLink clients on a single lda ;OPL_USR_TBLS_FIRST = Y ; Sort SQLTables starting with user tables SHOW_REMARKS = N ; Retrieve SQLColumns REMARKS field CURSOR_SENSITIVITY = LOW ; Set to HIGH after loading odbccat10.sql ;OCI_PREFETCH_ROWS = 100 ; Number of rows to prefetch ;OCI_PREFETCH_MEMORY = 65535 ; Amount of memory to use for prefetching ;LD_LIBRARY_PATH = /dbs/oracle100/lib ; Find shared libraries ;SHLIB_PATH = /dbs/oracle100/lib ; Find HP/UX shared libraries ;LIBPATH = /dbs/oracle100/lib ; Find AIX shared libraries ;NLS_LANG = AMERICAN_AMERICA.UTF8 ; Uncomment for Unicode connections
- Pass the root of your Instant Client installation to
ORACLE_HOME.
- Pass the root of your Instant Client installation to the relevant library path variable.
- Ensure no semicolon appears in front of the relevant library path variable.
- Save your changes and exit the file.
- Open your Windows Control Panel.
- Locate the Services utility.
(It may be in the Administrative Tools sub-folder.)
- Launch Services.
- Locate the OpenLink Request Broker Service in the list box.
- Restart the OpenLink Request Broker service.
ODBC to Jet Data Type Mapping for Oracle
The following table details how the OpenLink drivers for Oracle fetch numeric data.
The SQL type reported for a SELECT column varies depending on the native Oracle type of the column, its precision, and its scale.
The OpenLink C type used to fetch the data is also shown, together with the effect of the JetFix command line switch.
Changes to the type mappings are shown in the table as italics.
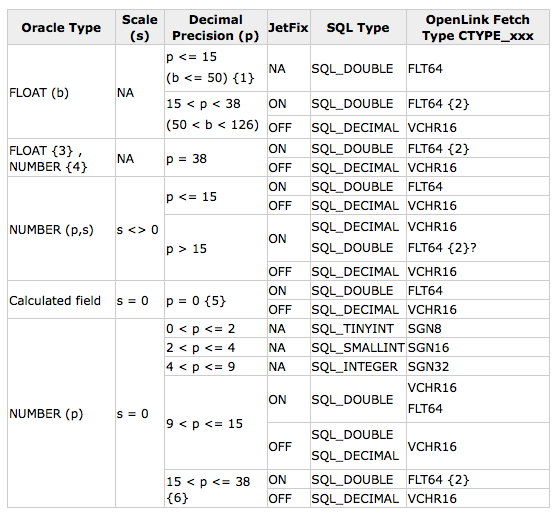
{Notes} on the above table
-
FLOAT(b)specifies a floating point number with binary precisionb. The precision can range from 1 to 126. To convert from binary to decimal precision, multiplybby 0.30103.
- Possible loss of precision
-
FLOATspecifies a floating point number with decimal precision 38, or a binary precision of 126.
-
NUMBERspecifies a floating point number with decimal precision=38.
- Oracle appears to return s
=0, p=0 for a calculated field
- Oracle permits a maximum precision of 38.
Precision of OpenLink C Types
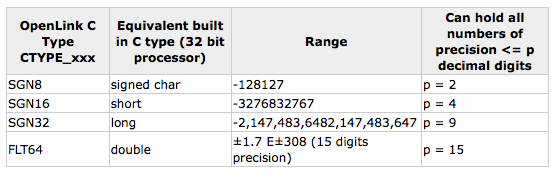
The choice of OpenLink C type used to fetch a numeric value is determined by the maximum precision supported by the type.
If a numeric type exists which can represent the data to be fetched without loss of precision, then this is used as the preferred fetch type.
If a numeric type capable of supporting the required precision does not exist, then the data is fetched in character form, unless the JetFix switch is on.
In this case, the data is fetched using the CTYPE_FLT64 fetch type.
This type has sufficient range to store the maximum numeric values supported by Oracle, but its use may result in a loss of precision, if the precision of the data to be fetched exceeds 15 decimal digits.
Oracle Real Application Clustering
What is Real Application Clustering?
Oracle Real Application Clustering (RAC) uses Transparent Application Failover (TAF) which is a protocol within Oracle whereby, if a connection to a database node fails, it can be re-established against an alternative node.
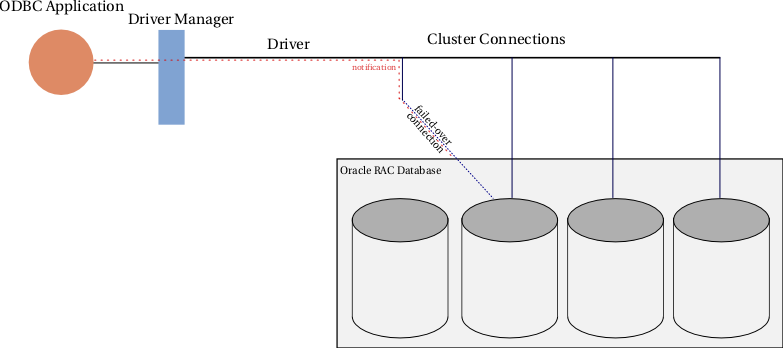
Once a broken connection has failed-over, an application can continue without any special action on its part. However, TAF does not restore all facets of a connection. For instance, TAF does not:
- restore active transactions - any active transactions are rolled back at the time of failure because TAF cannot preserve active transactions after failover: the application instead receives an error message until a
ROLLBACKis submitted
- restore session properties set using '
ALTER SESSION'
- maintain the state of server-side program variables, such as PL/SQL package states
If any of these situations apply to a failed connection, an application may need to take action following failover to return the connection fully to the desired state. In order to do this, the application may request to be notified when failover has occurred. Both the "Lite" Edition and the "Enterprise" Edition Generic Client provide this facility through TAF event notifications.
The "Lite" Edition ODBC Driver and the "Enterprise" Edition Database Agent both enable configuration of the failover retry interval and the maximum number of failover retries, in the event that failover is not successful on the first attempt.
How to Configure UDA to use Oracle Real Application Clustering
Single-Tier "Lite" Edition on Unix-like OS
- Log in to the machine that hosts the Single-Tier (Lite) drivers.
- Use a text editor to open the
openlink.ini($OPENLINKINI) file that resides in the bin sub-directory of the Single-Tier installation.
- Locate the
[Environment Oracle 10.x]section.
- Create and set the following two variables:
INI OPL_TAF_MAX_RETRIES = 10 ; This is the maximum number of times that the driver will retry the connection. OPL_TAF_RETRY_INTERVAL = 5 ; This is the number of seconds that the driver will wait between connection attempts.
- Save your changes and exit the file.
Single-Tier "Lite" Edition on Windows
- Log in to the machine that hosts the Single-Tier "Lite" Edition drivers.
- Launch your ODBC Data Sources Administrator.
- Locate the relevant DSN.
- Click the Configure button.
- Scroll through the configuration screens until you find the "Enable TAF" checkbox.
- Check the TAF checkbox to prompt the driver to attempt multiple failover connections to alternative DBMS nodes.
- Configure the rest of the fields related to TAF:
- Maximum Retries - This is the maximum number of times that the driver will retry the connection.
- Retry Interval (secs) - This is the number of seconds that the driver will wait between connection attempts.
- Maximum Retries - This is the maximum number of times that the driver will retry the connection.
Multi-Tier "Enterprise" Edition on any OS
- Log in to the machine that hosts the Multi-Tier server components installation.
- Use a text editor to open the
oplrqb.inifile that resides in the bin sub-directory of the Multi-Tier installation.
- Locate the
[Environment ORACLE10]section.
- Create and set the following two variables:
INI OPL_TAF_MAX_RETRIES = 10 ; This is the maximum number of times that the driver will retry the connection. OPL_TAF_RETRY_INTERVAL = 5 ; This is the number of seconds that the driver will wait between connection attempts.
- Save your changes and exit the file.
- Restart the Request Broker.
Programmatic Considerations
Our ODBC drivers notify ODBC applications that failover has occurred using two mechanisms: event call-backs and SQLSTATEs.
TAF Event Notification: Call-backs
An application can register a failover call-back routine by setting the proprietary connection attribute SQL_ATTR_EVENT_CALL-BACK (1280) on an open connection.
The routine's address is supplied as the value of SQLSetConnectAttr's ValuePtr argument.
The same call-back routine can be registered for more than one connection.
The call-back routine's signature must take the form:
void (*call-back) (oplevent_t   oplEvent,
SQLHANDLE    handle,
SQLUSMALLINT eventInfo)
where:
-
oplEventis an integer indicating the type of event which took place.
-
contextis an application-supplied ODBC handle identifying the context the event is taking place in.
-
eventInfois an unsigned integer code providing more information about the event. The values returned depend on the type of event.0signifies 'no further information available'
oplEvent
is of type oplevent_t, an enumerated type enumerating the types of events reported to event call-backs.
oplevent_t is defined as follows:
typedef enum
{
OPL_EV_NONE             = 0,
OPL_EV_FAILOVER_SUCCESS = 16,
OPL_EV_FAILOVER_ABORT   = 17
}
oplevent_t;
At the moment, only failover events are supported through the OPL_EV_FAILOVER_xxx event class.
Other types of event may be supported in the future using this call-back mechanism.
OPL_EV_FAILOVER_SUCCESS indicates that failover was successful, OPL_EV_FAILOVER_ABORT that failover was aborted.
context
is the ODBC handle (HDBC) of the connection for which the application wishes to receive event notifications.
This handle should be supplied to the ODBC driver when the call-back is registered, using another Oracle-specific connection attribute, SQL_ATTR_EVENT_CONTEXT (1281).
If this attribute is not set, the call-back receives SQL_NULL_HANDLE for the handle argument.
(If other event types are supported in the future, this attribute may accept other types of ODBC handle, e.g., handles of type SQL_HANDLE_STMT, depending on the scope of the event.)
eventInfo
is reserved for future use.
All failover events currently return 0.
TAF Event Notification: SQLSTATEs
In addition to being informed of failover through a call-back routine, an ODBC application also receives notification through SQLSTATEs.
After failover completes, the first ODBC call to return on the affected connection can return one of two proprietary SQLSTATEs, IM500 or IM501:
-
IM500denotes successful failover completion. If the ODBC call generated no other errors, the call returnsSQL_SUCCESS_WITH_INFOwithSQLSTATE IM500and is accompanied by the informational message "Failover completed". As usual, the SQLSTATE and diagnostic message can be retrieved usingSQLGetDiagRec().
-
IM501("Failover aborted") indicates failover was unsuccessful. A function returning this SQLSTATE returns with return codeSQL_ERROR.
If the ODBC call returning the failover SQLSTATE fails for some reason, a diagnostic record holding the failover SQLSTATE and message is appended to any diagnostic records already generated by the failing call.
In this case, even if failover was successful, a SQLSTATE IM500 may be accompanied by a function return code of SQL_ERROR.
For instance, if a transaction was open at the time failover took place, SQLExecute() may return SQL_ERROR with two diagnostic records, for example:
- DiagRec #1 ?
Example Native error: 25402 SQLSTATE: HY000 Message: [OpenLink][ODBC][Oracle Server]ORA-25402: transaction must roll back
- DiagRec #2 ?
Example Native error: 0 SQLSTATE: IM500 Message: [OpenLink][ODBC][Oracle Server]Failover completed.
Note: Failover notification using TAF-specific SQLSTATEs cannot be used independently of failover call-backs. The use of these SQLSTATEs is only triggered when an application registers a failover call-back.
Related Links
Configure Oracle Reference Cursors in Stored Procedures
Configure Oracle Reference Cursors in Stored Procedures
No configuration is needed to leverage Oracle reference cursors in stored procedures.
OpenLink's drivers use the same syntax recognized by Oracle native and 3rd-party drivers.
Default Driver Capability
Default Driver Capability
This feature is a driver default and requires no additional configuration.
Configure Oracle Unicode Support
Configure Oracle Unicode Support
The Oracle configuration parameter for control character sets is the NLS_LANG environment variable, which should be set to the correct character set for your client. Oracle 8.1.7 claims to be capable of dynamically determining the character set in use on the client and does not require the NLS_LANG to be set, but it is not a bad idea to set it anyway.
Additional information on Oracle Unicode support can be found from otn.oracle.com
Upgrades and existing installations
Finding out what is installed, and moving to a newer release.
Upgrades & Pre-Existing Installations
Upgrades & Pre-Existing Installations
Identifying Pre-existing Installations
Use the following instructions to search for pre-existing OpenLink components on partner-supplied machines and other hardware:
1.
Open Windows ODBC Data Sources Administrators or Mac iODBC Data Sources Administrators.
Click on the Drivers tab.
Look for OpenLink driver entries.
2.
Open Windows registries.
Expand the HKEY_ LOCAL_ MACHINE\SOFTWARE\ODBC\ODBCINST.INI tree structure.
Look for OpenLink driver entries.
3.
Use the Windows explorer to search for oplrqb.exe, olod*.dll, or lite32.
4.
Open the Windows Services utility and look for an OpenLink Request Broker or License Manager service.
5.
Log in to Mac OS X machines and open the Applications folder.
Look for an OpenLink=>Universal Data Access Drivers folder structure.
6.
Log in to Unix machines and use the find / -name file -print command to search for the following files: oplrqb, oplodbc.s*, openlink.ini
Discovery of one or more of these files confirms the presence of OpenLink's Multi-Tier, Single-Tier or Express Edition drivers.
If you want to install new software, you have two options:
7. Remove the old software and start fresh.
8.
Obtain version information from the existing software and obtain new components from the same build.
Upgrades & Pre-Existing Installations
Upgrades & Pre-Existing Installations
Mixing & Matching Components from Different Versions
OpenLink Software does not support mixed-version installations. Mismatched client and server software may not hinder your ability to connect and query. However, version incompatibility issues will arise over time. In fact, if you mix OpenLink 3.x and OpenLink 4.x software, you can expect specific problems with stability, transactions, and threading. These problems may only be resolved by upgrading the older component.
Be advised: Under rare circumstances, you may be forced to deploy a mixed installation.
As stated previously, 3.x and 4.x components tend to generate problems.
However, 4.x client components appear to work well with 5.x server components.
Upgrades & Pre-Existing Installations
Upgrades & Pre-Existing Installations
Detecting Sofware Versions
You may employ a variety of methods to obtain your product version information.
Windows and Mac Single-Tier users should open their ODBC Administrator.
The Single-Tier driver version appears on the Drivers tab of this Administrator.
Users simple scroll through the Driver list box, locate their driver, and record the version string, which appears to the right of the driver name.
Windows & Mac Client Drivers (Express Edition/Single-Tier/Multi-Tier)
1.
Open your ODBC Data Sources Administrator or iODBC Data Sources Administrator.
2.
Click the Drivers tab.
3.
Scroll through the list box until you locate the OpenLink driver.
4.
View the driver version information that appears to the right of the driver name.
Unix Client Drivers (Single-Tier/Multi-Tier)
1.
Login to the client machine.
2.
cd into the root of the OpenLink installation.
3.
Execute the openlink.sh or openlink.csh shell script.
4.
cd into the /samples/ODBC (MT) or /bin (ST) sub-directory of the installation.
5.
Use odbctest or iodbctest to connect to your Data Source.
6.
View the driver version information that appears above the SQL> prompt.
7.
Alternatively, run one of the following commands from the /lib sub-directory:
| HP-UX | strings *.sl | grep "Driver" | sort -u |
| All Other Unix | strings *.so | grep "Driver" | sort -u |
Multi-Tier Server Components (All Platforms)
1.
Open a DOS Command Prompt, Unix console terminal, or similar command line utility.
2.
cd into the /bin sub-directory of the OpenLink server components installation.
3.
Type the broker or agent name and append -? or ?v to the end of the name.
For example:
oplrqb -?
ingii_mv -?
sql_mv -?
4.
Record the version information that is returned by the broker or agent.
Upgrades & Pre-Existing Installations
Upgrades & Pre-Existing Installations
Running Multiple Versions Simultaneously
You can run multiple driver versions for comparative and diagnostic purposes.
Take the following action to proceed:
Single-Tier & Express Edition Drivers
1.
Shutdown your License Manager, if you have OpenLink 6.0 drivers installed.
2.
Install your new drivers in a separate directory.
3.
Place your new license files in the /bin sub-directory of the new installation.
4.
Restart your License Manager, if you have OpenLink 6.0 drivers installed.
Multi-Tier Drivers
1.
Shutdown your License Manager, if you have OpenLink 6.0 drivers installed.
2.
Install your new drivers in a separate directory.
3.
Place your new license files in the /bin sub-directory of the new installation.
4.
Restart your License Manager, if you have OpenLink 6.0 drivers installed.
5.
Use a text editor to open the oplrqb.ini files that appear in the /bin sub-directories of both Multi-Tier server component installations.
6.
Locate the [Protocol TCP] section.
For example:
  [Protocol TCP]
PingWatchdog = No
PingInterval = 600
Listen     = 5000
PortLow    = 5000
PortHigh    = 5025
;IPAddress    = 127.0.0.1
7.
Insure that each Listen port references a different, unused TCP/IP port.
(Use PortLow for OpenLink 1.x-3.x.)
8. Save any changes to the oplrqb.ini files.
9. Start your Request Brokers.
BE ADVISED: The above instructions may not bring success in all scenarios.
The following issues could present challenges that warrant attention from OpenLink Product Support:
1. Differing Windows driver versions may share the same .dll name. This could provide configuration challenges.
2. Some Windows installers may force you to remove an older installation.
3.
OpenLink's 1.x and 3.x use UDP ports to broadcast license information.
You need to contact Product Support for specialized configuration in this instance.
Upgrades & Pre-Existing Installations
Upgrades & Pre-Existing Installations
Installing New Software on Top of Old Software
You can install new software on top of existing software.
However, this is not the preferred course of action, in many circumstances.
You should install new software to new directories, if you are attempting to compare software performance or troubleshoot problems.
Uninstalling Our Components
Removing installations of our components takes different steps for different platforms.
Windows
You may use the uninstall utility to remove existing Windows software. You may also use the Add/Remove Programs utility, which appears in the Control Panel.
Mac OS X
The following sequence will cleanly remove all iODBC and Data Access components added by our installers.
- Double-click the
Uninstall.commandscript (/Applications/OpenLink/Universal Data Access Drivers (* Tier Edition)). If the script is not present, skip ahead to #3. - Answer the questions posed by the script.
Please note that you must answer with the mixed-case, full-word answers.
Anything other than `
Yes`, `All`, or `Quit`, will be interpreted as `No`, including `y`, `Y`, and `yes`. - Verify that all of the following directories (including contents), and specified individual files, have been removed --
Example /Applications/iODBC /Applications/OpenLink* /Library/Application Support/iodbc /Library/Application Support/openlink /Library/Frameworks/iODBC* /Library/Java/Extensions/libopljodbc*.jnilib /Library/Java/Extensions/opljdbc*.jar /Library/Java/Extensions/virtjdbc*.jar /Library/LaunchDaemons/com.openlinksw.* /Library/ODBC/OpenLink* /Library/Receipts/iODBC* /Library/Receipts/Opl* /Library/Receipts/UDA* /Library/Receipts/VIRT* /Library/Receipts/Virt* /Library/StartupItems/Oplmgr /Users/*/Library/Preferences/com.openlinksw* /Users/*/Library/Saved Application State/com.openlinksw* /private/var/db/receipts/com.openlinksw.*
- You can copy and paste the following command into Terminal.app to remove all of the above --
Shell sudo rm -rf /Applications/iODBC /Applications/OpenLink* "/Library/Application Support/iodbc" "/Library/Application Support/openlink" /Library/Frameworks/iODBC* /Library/LaunchDaemons/com.openlinksw.* /Library/ODBC/OpenLink* /Library/Receipts/iODBC* /Library/Receipts/Opl* /Library/Receipts/UDA* /Library/Receipts/VIRT* /Library/Receipts/Virt* /Library/StartupItems/Oplmgr /Library/Java/Extensions/libopljodbc* /Library/Java/Extensions/opljdbc* /Library/Java/Extensions/virtjdbc* /Users/*/Library/Preferences/com.openlinksw* /Users/*/Library/Saved\ Application\ State/com.openlinksw* /private/var/db/receipts/com.openlinksw.*
Unix-like OS -- AIX, HP-UX, Linux, Solaris, etc.
We do not provide an uninstall utility for Unix-like platforms.
rm and rmdir should be used to remove existing deployments.
Upgrades & Pre-Existing Installations
Upgrades & Pre-Existing Installations
Performing Upgrades
Express Edition Upgrades1.
Terminate active ODBC connections.
2.
Back up your license file.
3.
Make sure you have the appropriate version JDK/JRE installed.
4.
Perform your upgrade.
Single-Tier Upgrades
1.
Terminate active ODBC connections, which use OpenLink's drivers.
2.
Back up license files.
3.
Back-up existing odbc.ini and openlink.ini files.
(Unix Only)
4.
Terminate the License Manager service if you use OpenLink 6.0 or newer drivers.
5.
Proceed with the upgrade.
Multi-Tier Upgrades
1.
Terminate active ODBC connections, which use OpenLink's drivers.
2.
Stop your Request Broker and License Manager services.
(License Managers are an OpenLink 6.0 and higher feature.)
3.
Back-up your license and oplrqb.ini files.
4.
Back-up odbc.ini files.
(Unix Client Installs Only.)
5.
Proceed with their upgrades.
BE ADVISED: Some installers present two options: 1) Upgrade Driver Name, 2) Install New Driver.
The first option should overwrite older drivers.
DSNs that use those drivers will be affected.
They should be migrated to the new driver.
However, to insure the integrity of existing DSNs, choose the second option.
This option installs the new driver alongside the old driver.
Pre-existing DSNs should not be affected in any way.
Upgrades & Pre-Existing Installations
Upgrades & Pre-Existing Installations
Reasons to Upgrade
Consultants should encourage end-users to upgrade to the latest software version. The latest software contains desirable new features and fixes for bugs. Additionally, support options are limited, when legacy software is involved. Development does not back-patch legacy bugs, and Support staff may have difficulties recreating legacy problems.
The following table lists new features for recent software builds:
| Build | Features |
|---|---|
| 4.x | ODBC 3.5 compliancy. Multi-Threaded client & server components. Substantially-revised communications layer. |
| 5.x | Unicode support. Zero Config. Best communications layer. |